Install Longhorn : Highly Available Kubernetes Storage and Disaster Recovery
Losing data lies on a spectrum between a slight annoyance and a bankruptcy level catastrophe. Hence, it is often important to use the proper tools and techniques to ensure a reliable and highly available data storage solution. In the world of homelabbers and midsize Kubernetes clusters, one popular solution is Longhorn.
If you don’t think this will happen to you let me remind you of the many ways you can lose your data, either completely or partially. These include :
- Hardware failure : I.e. your drive or server dies or something else happens to it physically.
- Software failure : Data can be deleted by a bug or by bad code.
- Network failure : You have lost connection to your storage which is now inaccessible.
- Human failure : You goofed and deleted your main database.
- Malicious actors : Someone else succeeded and deleted your main database.
- The sun and cosmic radiation flipping random bits : yes it happened in my country
- And more !
Longhorn is a storage system designed for Kubernetes. If used correctly, Longhorn can protect you from most dangers that would lead to data loss. The main features that it provides are :
- Volume replication across nodes for high availability (HA).
- Volume snapshots and backups for disaster recovery (DR).
In this tutorial, we are going to learn how Longhorn works, how to install it on your cluster, and how to use it.
Longhorn vs Its Competition
Longhorn is not the sole nor the main storage solution out there. The first question you need to answer is : is this the right tool for you and your use case? Let’s meet the competition.
Most storage solutions deployed by market share are proprietary solutions from hyperscalers like AWS, Google, or Azure. In general you won’t get to play with those as they are below many layers of abstraction. However, it is worth mentioning that the big players each have their own solution and that is what most people use indirectly.
For the rest of us who wish to manage our own compute cluster, there are a few alternatives that exist:
1. Rook-Ceph : If you have the capacity
- Pros: Most used, enterprise-grade, highly scalable, and feature-complete.
- Cons : Steep learning curve, difficult to set up, and heavy on the CPU and RAM compared to others.
- When to use : Large, powerful clusters managed by an experienced cloud team.
2. Portworx : If you have the money
- Pros: Enterprise-grade with 24/7 dedicated support and many advanced features that rival Rook-Ceph like Cross-Cloud Migration.
- Cons: Paid and expensive proprietary solution
- When to use : Enterprise environments requiring strict SLAs, multi-cloud mobility, and vendor-backed support.
3. OpenEBS : If you have specific needs
- Pros: Highly modular, it is the Arch Linux of clustered storage, making it great for heterogeneous storage clusters with very specific needs.
- Cons: Very niche use case requiring significant manual configuration and customization.
- When to use : Specialized or mixed infrastructure that demand customizable storage backends.
4. Longhorn : If you need the basics
- Pros: Very easy to set up and maintain, lightweight on CPU and RAM, and includes the core features you need for high availability (replicas, snapshots, external S3 backups, automated jobs).
- Cons: Doesn’t scale well for big clusters and lacks more complex features.
- When to use : Small to medium cluster looking for a lightweight highly available storage solution with basic features and easy maintenance.
How Longhorn works
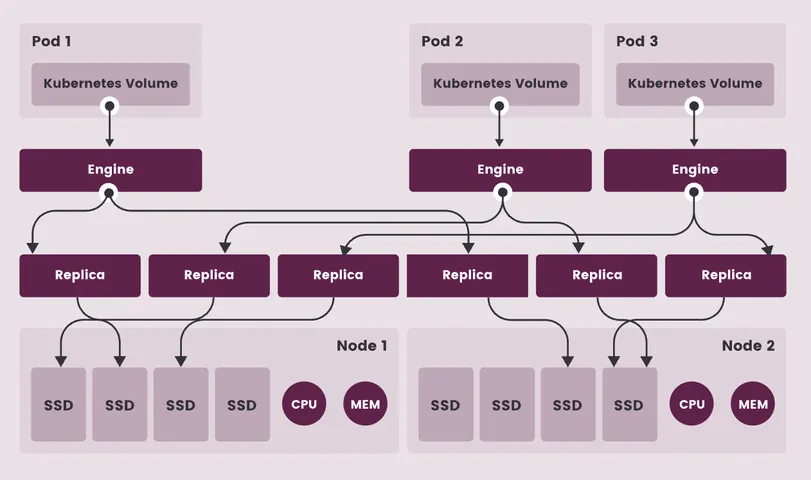
When you create a new volume with longhorn, it will appear as multiple replicas (3 by default). Consequently, Longhorn triples the storage requirement of volumes. These replicas are then distributed across separate nodes. Hence, if a node dies, your data is safe on some other node.
As comparison, Rook-Ceph uses only 150% of the storage needed. However, their solution requires more computation. Whether CPU or storage is your bottleneck may affect your choice of storage solution. Nonetheless, as we will see not everything needs 3 replicas.
Read & write on volumes are managed by longhorn engines which sit in front of the volume's replicas; each volume has at most one engine. Your pods only interact with this engine which then accesses replicas. Consequently, writing once means writing thrice (at least twice over the network). However, reads are served by only one replica.
Split-brain scenarios, are prevented since engines act as gatekeepers.
- If a node fails and contains a replica : The volume engine sees the replica as unavailable and drops it. It then marks the volume as degraded, and continues handling I/O without interruption.
- If a node fails and contains an engine : The Longhorn manager spawns a new engine in another node and reattaches workload to it. Volumes remain operational as long as at least one healthy replica is connected and the engine is available.
How to install Longhorn
First, you will need a cluster with at least two nodes with local storage; Longhorn stores data directly on the nodes.
On each node, Longhorn requires specific host dependencies. Run the following command on each of your nodes :
sudo apt-get update
sudo apt-get install -y open-iscsi nfs-common util-linux bash curl jq xfsprogs
sudo systemctl enable --now iscsidAssuming Helm is installed, add and update the Longhorn repository:
helm repo add longhorn https://charts.longhorn.io
helm repo updateNext, we will create a values.yaml file to configure our Longhorn installation. It is recommended to store this configuration file somewhere; I like to keep those in a separate git repos for my infrastructure.
Here is a basic example :
defaultSettings:
  defaultReplicaCount: 2
  storageMinimalAvailablePercentage: 10
persistence:
  defaultClassReplicaCount: 2
  defaultDataLocality: "best-effort"
ingress:
  enabled: true
  host: longhorn.home.arpa
tls: falseNotice a few choices :
- Replica Count = 2: Longhorn defaults to 3 replicas. I don’t have three nodes yet so I set it to two instead. Even if I had three nodes, I may keep this setting to avoid consuming too much storage. This settings is defined in two places :
defaultSettings.defaultReplicaCount: This applies only to volumes manually created through the Longhorn UI.persistence.defaultClassReplicaCount: This applies to Persistent Volume Claims (PVCs) provisioned natively through Kubernetes
- Data Locality (best-effort): When set to best-effort, Longhorn attempts to keep a local replica of the volume on the exact same node where the pod is running.
- Adjusting Reserved Storage: By default, Longhorn reserves 25% of disk space to prevent node pressure. I lowered the storage minimum available percentage to 10% to reclaim more usable space.
- The ingress fields are more standard and used to configure the longhorn UI.
Beware that these choices are mine and you probably will make different one. Don't simply copy without thinking of your own use case.
For more see the complete list of parameters here. I suggest you use something like this to explore it : yaml viewer
Other Interesting parameters include :
- Metrics : To integrate Longhorn with Prometheus.
- preUpgradeChecker.jobEnabled : Setting that allows Longhorn to perform pre-upgrade checks.
- Disable if you install Longhorn using Argo CD or similar solutions.
Once you are happy with your own values file, install with :
helm install longhorn longhorn/longhorn --namespace longhorn-system --create-namespace --values values.yamlIf you decide to change the values later for something else, use this to upgrade:
helm upgrade longhorn longhorn/longhorn --namespace longhorn-system --values values.yamlOnce installed, longhorn creates a new type of storage class in your cluster. Run this command to check if it is now the default one. You should see a class called longhorn.
kubectl get storageclassNow you can create a new volume and you will see that it is a longhorn volume.
That’s it, Longhorn is now installed!
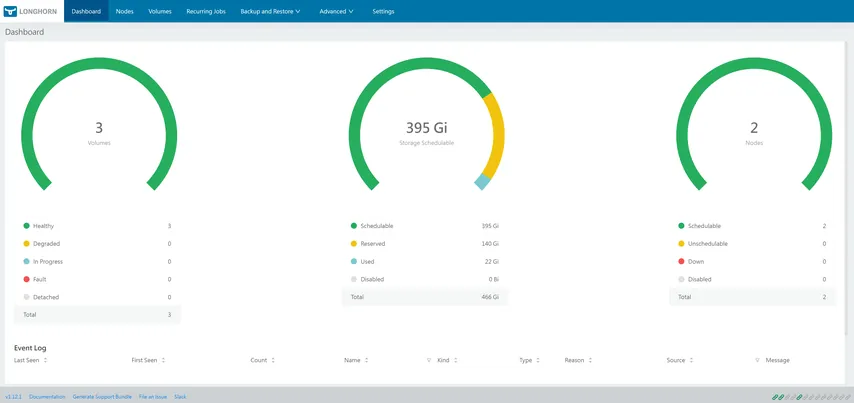
If you have enabled ingress, you can access the UI via whatever address you chose.
Longhorn : The Basics
How to Migrate Volumes to Longhorn
Once installed, any new volume will be longhorn volumes. However, old volumes won't change and will need to be migrated.
Here is one procedure to do this migration properly :
Remember to never do this in production or on important volumes first. Only once you have validated the method can you do this on real production data if you need to migrate.
If you are insane like me you can also use korb copy twice strategy. Which does the clone, delete, clone back in one command; and skips the test step. I can't stress enough how bad an idea this is for real production data. (Don’t forget to scale down and then up) :
korb my-pvc --source-namespace=<namespace> --new-pvc-storage-class=longhorn --strategy=copy-twice-nameCreating Multiple Storage Class
Not everything needs the same level of high availability (HA). Some application don't need it at all; other need even more resilience. If this is your case, you may want to create multiple separate storage class for various needs.
For example, you may create storage class with
- 1 replicas for apps that do not need HA
- 2-3 replicas for apps that need some level of HA
- Zone-aware replicas, typically if you need High Availability across Zones.
Beware that creating classes with too many replicas will lead to write latency spikes. Anything above 3 is not recommended in most setup.
Zones are physically isolated clusters. Longhorn is compatible with zone based topology and will spread replicas across zones if we ask it to.
For example, here is a new storage class that is zone aware :
apiVersion: storage.k8s.io/v1
kind: StorageClass
metadata:
  name: longhorn-zone-aware
provisioner: driver.longhorn.io
parameters:
  # Create 3 copies of data, good for a 3-zone cluster
  numberOfReplicas: "3"

  # Soft Anti-Affinity controls what happens if a zone goes down:
  # "enabled": Longhorn prefers different zones, but allows fallback to an existing zone if one fails.
  # "disabled": Longhorn STRICTLY forces replicas into different zones (provisioning fails if <3 zones exist).
  replicaZoneSoftAntiAffinity: "enabled"

  # Prefers keeping 1 replica on the node where the consuming workload/Pod runs for low-latency reads
dataLocality: "best-effort"Then when creating a new zone aware HA volume, you need to explicitly specify this storage class like so :
apiVersion: v1
kind: PersistentVolumeClaim
metadata:
  name: zone-aware-pvc
spec:
  accessModes:
    - ReadWriteOnce
  storageClassName: longhorn-zone-aware
  resources:
    requests:
storage: 10GiLonghorn : Data Resilience and Disaster Recovery
Sometimes replicas aren't enough. They can't save you if your whole cluster goes down, if your volume gets corrupted or if you eventually make mistakes. Luckily, Longhorn provides a few features to help us out in times like this; provided that we set them up correctly. These are :
Snapshots : They are similar to git commits but for volumes, snapshot allow us to rollback a volume to a previous point in time. This is useful to recover from data corruption or a human mistake. They are stored alongside replicas and thus are also replicated. They serve as the quickest way to recover if the related volume is still healthy.
Backups : This is your last line of defense. Backups allow you to recover volumes that are completely lost. They are used for data that is valuable, not everything needs to be backed up. Especially since backup requires more storage, constant maintenance and testing.
Backups should be stored externally, in a separate location than your cluster. You don't want to lose your backups when you need it most. Thankfully, Longhorn allows you to connect to services like S3 buckets or NFS server to store your backups.
Disaster recovery volumes: They provide an way to automate the failover process to a secondary backup cluster. Basically, you deploy a standby DR volume in a secondary cluster and it continuously sync with a backup. If you have an incident, you can transform that DR volume into a normal Longhorn volume and use it right away. The goal is to reduce the time to recovery also called RTO.
System Backup Longhorn also has a feature used to save its configuration and restore from it if needed. However, I would advise that you don't do any configuration via the UI but only through Kubernetes manifest stored in a git repos. In that case, System Backup is not that useful.
How to Set up Snapshots
Snapshots can be created manually but the better approach is to use Longhorn recurrent jobs.
As you amass snapshots, Longhorn will delete old ones automatically. You can configure this in the job definition and in the
values.yamlused to install Longhorn. Just search for "snapshot" in here.
For example, this is a recurrent snapshot job :
apiVersion: longhorn.io/v1beta2
kind: RecurringJob
metadata:
  name: test-job
  namespace: longhorn-system
spec:
  task: snapshot
  cron: "*/5 * * * *"
  retain: 5 # How many snapshots to retain
  concurrency: 1

  # Group assignments (volumes must be tagged to match this group)
  groups:
- snapped-volumesAfter applying it, you should find it in the UI in the recurring job tab :
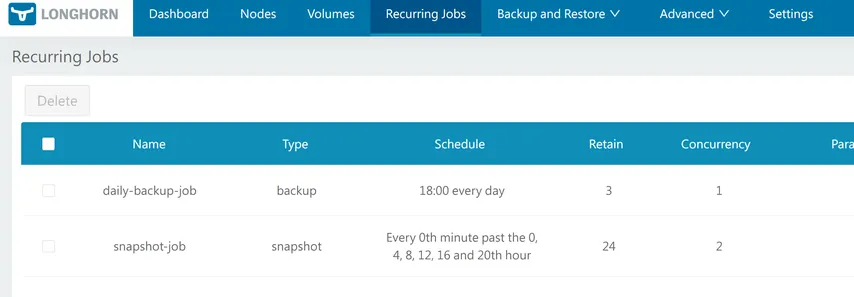
To link volumes to those jobs, you can add labels to your PVC definition directly in the manifest. I would recommend this approach to make sure that this information is encoded and committed.
apiVersion: v1
kind: PersistentVolumeClaim
metadata:
  name: my-pvc
  namespace: default
  labels:
    # 1. Enables syncing between the PVC and the Longhorn volume
    recurring-job.longhorn.io/source: "enabled"

    # 2. Assigns this PVC to the "database-tier" group
    recurring-job-group.longhorn.io/snapped-volumes: "enabled"
spec:
  accessModes:
    - ReadWriteOnce
  storageClassName: longhorn
  resources:
    requests:
storage: 20GiOr if need you can manually label an existing PVC like so:
kubectl label pvc my-pvc -n <namespace> recurring-job.longhorn.io/source=enabled
kubectl label pvc my-pvc -n <namespace> recurring-job-group.longhorn.io/snapped-volumes=enabled
How to Set up Backups
Backups are defined during installation in the values.yaml file. Using the parameter defaultBackupStore Like this :
defaultSettings:
  defaultReplicaCount: 2
persistence:
  defaultClassReplicaCount: 2
  defaultDataLocality: "best-effort"
ingress:
  enabled: true
  host: longhorn.home.arpa
  tls: false
defaultBackupStore:
  backupTarget: s3://longhorn-backups@garage/
backupTargetCredentialSecret: longhorn-backup-storeYou also need to define a secret to define access keys and endpoint like this :
apiVersion: v1
kind: Secret
metadata:
  name: longhorn-backups-secret
  namespace: longhorn-system
type: Opaque
stringData:
  AWS_ACCESS_KEY_ID: "xxx"
  AWS_SECRET_ACCESS_KEY: "xxx"
AWS_ENDPOINTS: "https://<Some https endpoint>"You can then upgrade your longhorn installation and restart it for changes to apply.
helm upgrade longhorn longhorn/longhorn --namespace longhorn-system --values values.yaml
kubectl rollout restart daemonset longhorn-manager -n longhorn-system
kubectl rollout status daemonset longhorn-manager -n longhorn-system
You should then see the backup configured in the UI :
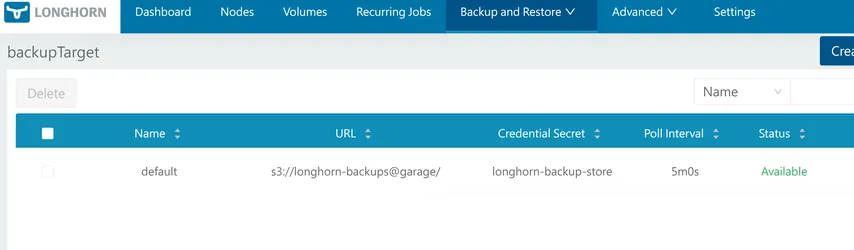
Similarly to snapshots, you can create a backup job like so and then label the volumes that needs to be backed up :
apiVersion: longhorn.io/v1beta2
kind: RecurringJob
metadata:
  name: daily-backup-job
  namespace: longhorn-system
spec:
  name: daily-backup-job
  task: "backup"
  cron: "0 0 * * *"
  retain: 3
  concurrency: 1
  groups:
- backed-volumesIf you need to use a backup :
- Got to the Longhorn UI
- Select a volume
- Select restore latest backup
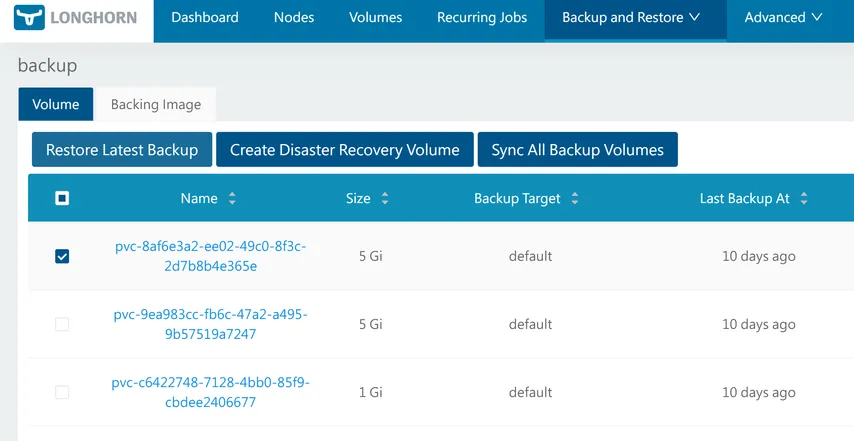
You can decide to keep the previous name, this will override the existing volume. Only do this if you trust that your backup are healthy or if the existing volume is already lost. For the rest, it depends, you should match the existing volume as much as possible unless you have a reason.
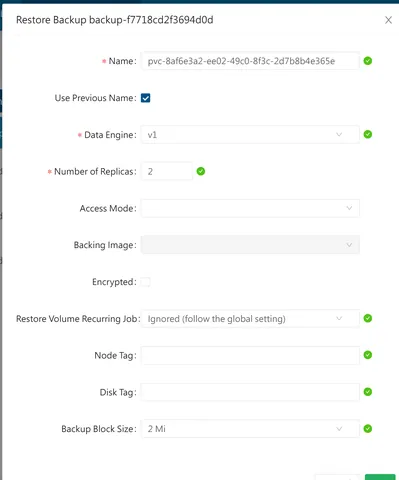
Testing backups must be done frequently. A backup that is only used in times of crisis is likely to fail. Regular testing ensures that you trust your backups and you know the restoring process. This can be automated to some extent. However, for important data it is important to be in the loop.
How Longhorn Behaves When a Node Dies
When a node crashes ungracefully, a race condition occurs between Kubernetes pod rescheduling and Longhorn replicas lifecycle, this can cause pods to stall in the ContainerCreating state. Let me explain.
Kubernetes waits 5 minutes by default before attempting to evict the pod from the dead node. Additionally, Kubernetes never automatically deletes StatefulSet pods on failed nodes. They sit in Terminating indefinitely unless manually cleared.
This delay is a deliberate design choice dictated by the CAP theorem. Because Kubernetes cannot distinguish between a dead node and a network-partitioned node (which might still be writing dirty data to disk), Longhorn refuses to release the volume lock early. It chooses Data Integrity to completely prevent split-brain data corruption.
You can speed up this process by
- Setting
tolerationSeconds: 30on your workloads. This means faster reaction time but also more risks of K8s reacting too quickly to false alarm. - Enabling Longhorn's
node-down-pod-deletion-policyOr by manually deleting the stalled pod with
kubectl delete pod <pod-name> -n <namespace> --force --grace-period=0This is safe if getting your app back online quickly matters more to you than the risk of losing a few seconds of recent data. Or if the node is truly dead and not network-partitioned.
Other Longhorn Features
The Engine and Why You Shouldn't Change It
By default Longhorn uses the version 1 for any volume engines it deploys. However, a version 2 is available. It is faster but also heavier and still experimental as of the writing of this article. You can read more about it here.
From user discussions, the conclusions is that you should probably avoid V2, at least for production. V1 is good enough for most use case.
Attach Vs Detached Volumes
One important Longhorn concept is whether volumes are attached or detached.
A volume is attach to a node when in use. It means an engine has been created in that node and pods are allowed to use it. When detaching a volume, it is not deleted but in a disabled state. The engine is shut down and replicas go into an idle state.
In general Kubernetes manages attachment/detachment but you can manually attach or detach volumes for a multitude of reasons. For example, it is better to clone detached volumes to avoid active writes during the process. Other use case include fixing deadlocked volumes, or debugging.
Replica anti-Affinity and Locality
We have already mentioned the concept of Anti-Affinity at the zone level and Longhorn doesn't stop there. You can define Zone, node, and disk Anti-Affinity. For example, you could allow multiple replicas on the same node but not on the same disk on that node. It is always configured either soft (best-effort) or hard (strict).
A similar concept is data locality, which is another Longhorn parameter. When enabled, Longhorn will try to keep at least one replicas on the same node as the attached pods. By default it is disabled but it can be set to best-effort or strict-local. Note that strict local is only supported for volumes with single replicas.
Backing Image
Backing Image provide a pre-populated disk image; it's like a Docker base image. This is great for quickly spinning up virtual machines, staging data or ML datasets. Additionally, each volume only needs to store its own modifications. This helps save bandwidth and storage capacity.
Observability and Alerts
Longhorn can be connected to Prometheus to produce various metrics. Helping you manage your storage and create alerts.