How to migrate the Raspberry Pi 5 OS to an NVMe SSD
7 min read
Learn how to manually migrate your Raspberry Pi 5 operating system from a USB stick or SD card to a faster NVMe SSD. This step-by-step guide covers partitioning, copying files, updating boot configurations, and avoiding common pitfalls.
So far I have a working pi running with its OS on a USB stick. In your case it might be on a SD card. I moved the OS to the SSD because it's faster and more durable. Additionally, since I don't use SD cards, it was my only storage option. However, the Raspberry Pi Imager doesn’t let you choose to do that and I ended up having to copy the OS to the SSD manually. Let me explain how to do it and the pitfalls I ran into.
The migration has four parts:
partition and format the NVMe
copy the running OS from USB to the NVMe
update boot configuration so Linux mounts the NVMe root filesystem
change the EEPROM boot order so the Pi prefers NVMe
Step 1: A few checks
First, ensure your Pi 5 has the latest firmware, which includes the most recent NVMe boot support.
Open an ssh terminal and run:
sudo apt update && sudo apt full-upgrade -y
Update your Pi's EEPROM (bootloader):
sudo rpi-eeprom-update -a
Reboot your Pi:
sudo reboot
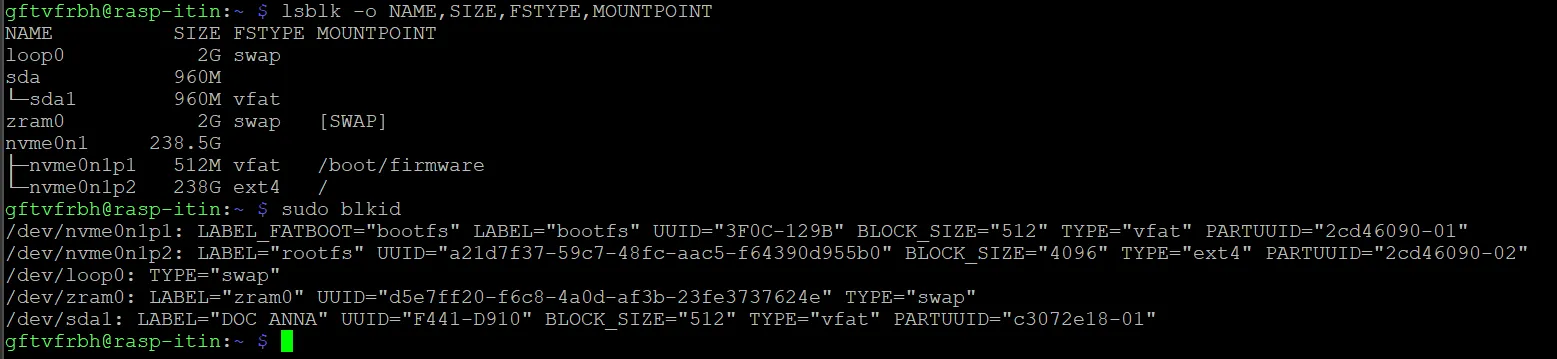
Then we need to check what the system sees, run this:
lsblk -o NAME,SIZE,FSTYPE,MOUNTPOINTsudo blkid
In a typical setup:
the USB system disk shows up as sda
the NVMe shows up as nvme0n1
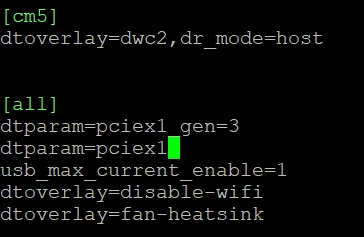
Then we need to make sure we have properly set up the pcie slot on the Pi. Run this command:
sudo nano /boot/firmware/config.txt
And add these lines after [all] if they are not present.
[all]dtparam=pciex1dtparam=pciex1_gen=3
Step 2: Partition and format the NVMe
First, remove the old partition layout that comes with the SSD and initialize the disk with GPT (GUID Partition Table, not the AI model!):
That layout mirrors the normal Raspberry Pi OS pattern: a boot partition plus a separate root filesystem, with the root later referenced by PARTUUID. As for the different file system, the Raspberry Pi firmware usually cannot boot directly from an ext4 boot partition so FAT32 is a safe bet. However, you cannot use FAT32 for Linux since it lacks Unix permissions and other core filesystem features Linux expects.
Step 3: Copy the running OS from USB to the NVMe
First, create temporary mount points and mount the SSD partitions there. Once mounted, these paths expose the contents of the NVMe partitions, which makes it easy to copy the system onto them.
sudo mount /dev/nvme0n1p2 /mnt/nvmerootsudo mount /dev/nvme0n1p1 /mnt/nvmeroot/boot/firmware
Then we copy the OS using rsync with /mnt/nvmeroot as a target so you preserve permissions, ownership, ACLs, xattrs, and symlinks while avoiding pseudo-filesystems such as /proc and /sys.
These exact values must be used consistently in the next step.
Step 5: Update cmdline.txt
This is a boot parameter file read very early during startup.
Open the file:
sudo nano /mnt/nvmeroot/boot/firmware/cmdline.txt
Find the existing:
root=PARTUUID=...
Replace it with the PARTUUID of nvme0n1p2.
Important:
cmdline.txt must remain a single line
the root=PARTUUID must point to partition 2 (nvme0n1p2), not the boot partition
Raspberry Pi OS uses PARTUUID here instead of a device name like /dev/nvme0n1p2 or /dev/sda2, because device names can change between boots. If this value is wrong, the Pi may find the boot files but fail to mount the root filesystem.
Step 6: Update /etc/fstab
It tells Linux which filesystems should be mounted automatically after boot, and where.
Open:
sudo nano /mnt/nvmeroot/etc/fstab
We need to edit it to make sure it references the NVMe partitions, not the old USB ones.
A bad /etc/fstab can leave the system unable to finish booting cleanly, and Raspberry Pi forum guidance explicitly warns that a wrong PARTUUID there can drop the machine into emergency mode.
Step 7: Unmount and switch boot order
You unmount the SSD so Linux finishes and closes the filesystem properly before trying to boot from it.
First, force pending filesystem writes from memory to be flushed to disk using the command:
cat /proc/cmdline showing the same root PARTUUID you put into the SSD’s cmdline.txt
Only after that check should you power down and remove the USB boot drive.
Step 9: Expand the root filesystem if needed
Once you know the Pi is really running from NVMe, run:
df -h /
If the root filesystem already shows the expected SSD size, you can skip this step.
Otherwise, expand the root partition to use the full SSD:
sudo raspi-config nonint do_expand_rootfs
Warning: do_expand_rootfs can change the PARTUUID.
This command may regenerate the partition table and assign a new PARTUUID to the root partition.
If the PARTUUID changes, the system will fail to boot because cmdline.txt and /etc/fstab still reference the old one.
Before running this command, record the current PARTUUID so you can update both files if needed:
sudo blkid /dev/nvme0n1p2
After running do_expand_rootfs and BEFORE rebooting, verify that the PARTUUID has not changed:
sudo blkid /dev/nvme0n1p2
If the PARTUUID is different, update it in /mnt/nvmeroot/boot/firmware/cmdline.txt and /mnt/nvmeroot/etc/fstab, then reboot again.
Raspberry Pi documents do_expand_rootfs as the noninteractive way to grow the root filesystem after cloning or resizing.
Once you are done you can reboot and remove the USB Key. The OS is now on the SSD!
The pitfalls I ran into
Although everything we have done can be executed via ssh, if you mess some things up, you might need a direct connection so I would suggest grabbing an HDMI cable with a male micro-HDMI for debugging.
This was my case and here are the few issues I ran into.
Pitfall 1: Using the wrong PARTUUID
Double check whether the exact root PARTUUID in cmdline.txt matches nvme0n1p2 meaning the root partition.
Pitfall 2: Editing the wrong file
When you are booted from USB and preparing the SSD, you are editing the future SSD copy, not the currently running system.
That means you have to edit /mnt/nvmeroot/boot/firmware/cmdline.txt and /mnt/nvmeroot/etc/fstab. Not the live system’s /boot/firmware/cmdline.txt and /etc/fstab that exists only on the USB stick.
Pitfall 3: cmdline.txt must stay on one line
cmdline.txt is not a normal config file with one option per line. It is a single-line kernel command line. If you insert line breaks or split it carelessly, boot can fail.
Pitfall 4: The Pi kept booting the broken NVMe instead of falling back to USB
If the EEPROM boot order is set to NVMe first, and the NVMe is “bootable enough” to get into the early stages, the Pi may continue trying the SSD rather than falling back neatly to USB.
A half-broken NVMe can be worse than a fully absent one, because it can still win the boot race. Sometimes the fastest recovery is to wipe the SSD’s partition table, since we are only copying the OS that is not too bad.
If the Pi keeps preferring a broken NVMe and you cannot easily remove the HAT or SSD physically, one blunt but effective recovery path is to destroy the partition table on the NVMe so it is no longer bootable. Once the SSD no longer looks bootable, the bootloader can move on to USB according to boot order.
A typical wipe looks like this:
dd if=/dev/zero of=/dev/nvme0n1 bs=1M count=100
That writes about 100 MB of zeroes to the start of the SSD and usually destroys the partition table and early boot metadata.
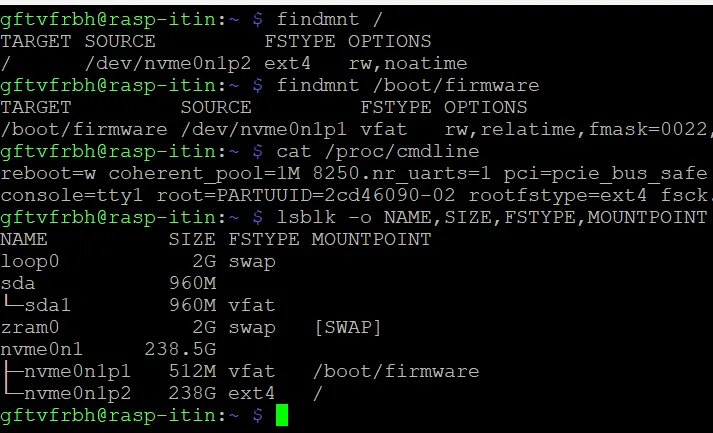
Pitfall 5: Verifying after reboot matters more than the copy itself
You can do the copy perfectly and still remain booted from the USB drive after reboot if the boot order, PARTUUIDs, or boot files are not right.
Always check before removing the USB drive:
findmnt /findmnt /boot/firmwarecat /proc/cmdline
Final thoughts
Moving Raspberry Pi OS from a USB boot drive to an NVMe SSD is not hard, but it can be tricky.
The copy itself is the easy part. The real difficulty is that boot depends on several layers agreeing with each other:
the EEPROM boot order
the boot partition contents
the kernel command line
the root filesystem identifiers in /etc/fstab
The good news is that once you understand the possible failure modes, it is easy to fix. Check the devices, check the PARTUUIDs, verify after reboot, and do not remove the USB drive until you have proven the system is actually running from NVMe.
That’s it! The Pi hardware and OS are now ready for anything we want. In the next chapter, we will see how to install Pi-hole as a local DNS server for ad-blocking and more.
As an independent AI researcher/developer specialized in Natural Language Processing (NLP), I have a comprehensive expertise in the development and integration of AI systems, as well as data analysis.
Is your company looking to integrate AI solutions, analyze data, or strengthen its back-end development? Contact me!