Argo For Kubernetes: From Argo CD to Workflows and Image Updater | A complete Guide
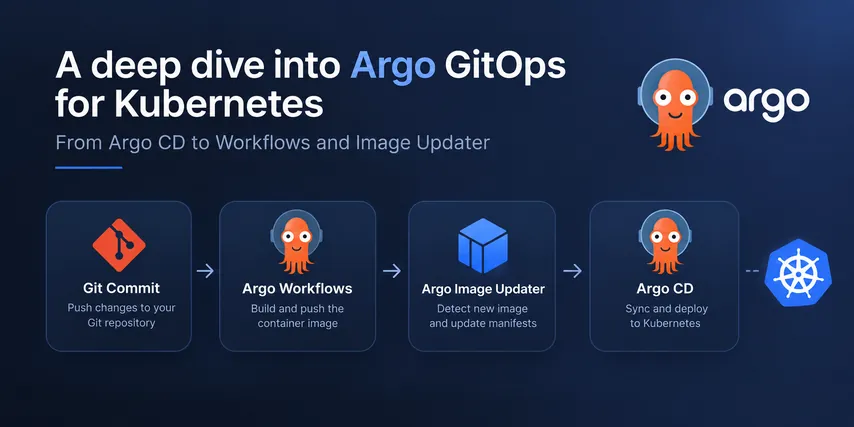
I recently migrated all of my services away from GitHub Actions to a complete, end-to-end Argo ecosystem. This includes using Argo CD for Kubernetes manifest deployment, Argo Workflows for image builds, and Argo Image Updater for continuous deployment. In this guide, I’ll walk you through setting up the exact same workflow step by step.
Be aware : In this article, we will learn the basics of Argo and thus we will take some shortcuts for simplicity's sake. Thus, some of the design choices may not be appropriate for a production setup.
You can follow along with the complete source code and manifests in the : Argo-tutorial
Argo Ecosystem Vs GitHub Actions
The first question is why use Argo and not Github Actions?
Security & Architecture
Being a pull-based solution, Argo is inherently more secure. GitHub Actions requires remote access to your cluster to deploy manifests. In contrast, Argo lives inside your cluster. It only needs to read your Git repository; cluster credentials never leave your network.
Native Pruning
Pruning is native to Argo. Without it, deleting a YAML file from your Git repo requires you to manually run kubectl delete to remove the same resource from the cluster. Argo monitor your git repos, meaning if a resource manifest is removed from Git, Argo will automatically prune it from the cluster (this can be disabled). With Argo, your repo is the source of truth, and your cluster remains in control.
Visibility
I also find Argo easier to debug and visualize. Its web UI makes it clear what is deployed and what went wrong.
Independence from GitHub
For me, these features were not the main reasons for the switch. Curiosity played a part, but the main trigger was that my GitHub organization was flagged for a few months. This disabled many features like GitHub Actions.
Why? One of my Actions was to check all links in my blog. It was looking for dead links and performing internal analysis. One of those external links had changed ownership to someone on GitHub's blacklist. A workflow that had worked for months suddenly got me flagged, without notice, email, or warning.
After months of discussions with GitHub support who simply wouldn’t explain the issue, I finally figured it out and got my account back. In the meantime, I needed an alternative not dependent on the whims of an external organization. Thus, I switched everything to Argo while keeping only my code on GitHub (for now).
The beauty of Argo is that I could move to GitLab or a self-hosted Gitea with practically no changes; Argo doesn’t care where the repos are hosted. I’m fully independent from GitHub now. The only reason I keep using GitHub is to ensure my code is backed up outside my cluster.
Prerequisites
Obviously, before we do anything, you will need a running Kubernetes cluster and the kubectl CLI configured to access it. Read this article and this oneif you want learn about this.
You also need Helm installed. Helm is going to help us install Argo. Installing it is as simple as running one of these commands :
#Linux
sudo apt-get install helm

#Windows
choco install kubernetes-helm

#Mac OS
brew install helmPour plus d'option d'installation, voici la documentation officiel.
Step 1: Install Argo CD
Argo CD is the main character in this story. Its role is to watch your Git repository and keep your Kubernetes cluster in sync with the manifests stored there. This means every time you commit a change to a manifest, Argo will see it and apply directly.
To be clear Argo CD only manages your yaml files that's it, it doesn't build or pushes images. For that we will use Argo Workflow and Argo Image Updater. We will see how to do this later but one thing at a time.
Install Argo CD with Custom Values
To deploy Argo, we first need to add the Argo Helm repository:
helm repo add argo https://argoproj.github.io/argo-helm
helm repo updateThen, it is good practice to create a values.yaml file to store the parameters we will use to set up Argo. Here is an example:
global:
  domain: argo.home.arpa

configs:
  params:
    server.insecure: true
    server.redirect.https: "false"

server:
  ingress:
    enabled: true
    hostname: argo.home.arpa
    annotations:
      traefik.ingress.kubernetes.io/router.entrypoints: web
    paths:
      - /
pathType: PrefixThis configuration states that the Argo web UI will be deployed on argo.home.arpa in an insecure way, which is fine for a local setup. Of course, you can choose any other url for the hostname, this is all up to you.
If you wish to have remote access with HTTPS, I suggest you read my previous article on the subject. Beware that this is risky as it create a new potential attack surface.
You can save this manifest wherever you like. For me, since this is core infrastructure, I save it in my infra repos in a folder called argocd/. I will do the same for the rest of the files needed to set up Argo.
Then, you can install Argo via Helm using this command, which will create the namespace argocd and deploy Argo CD:
helm upgrade --install argocd argo/argo-cd --namespace argocd --create-namespace -f values.yamlOnce done, you should be able to connect via the configured URL, for me argo.home.arpa. For your first connection, your username is "admin" and your password is a Kubernetes secret called argocd-initial-admin-secret. You can retrieve it via command lines like this:
#Linux
kubectl -n argocd get secret argocd-initial-admin-secret -o jsonpath="{.data.password}" | base64 -d

#Windows
$encoded = kubectl -n argocd get secret argocd-initial-admin-secret -o jsonpath="{.data.password}"
[System.Text.Encoding]::UTF8.GetString([System.Convert]::FromBase64String($encoded))You can also consider using a Web UI like Portainer to access secrets more easily
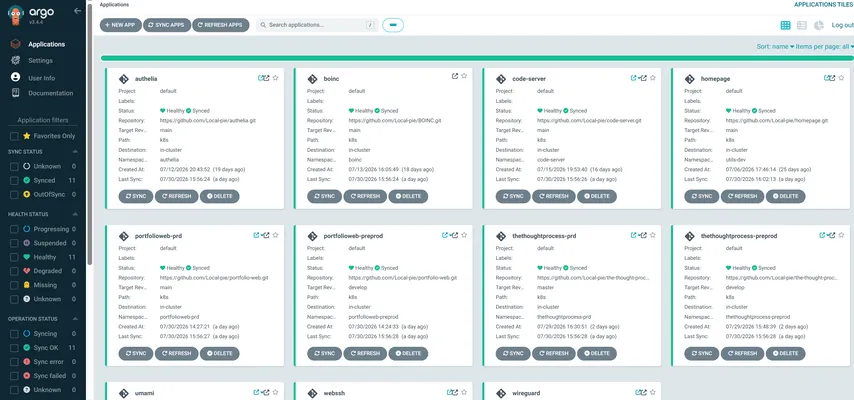
You should be able to connect now and find an empty Argo UI ready for use. This where you will find your application and their status. It is very useful for debugging.
Configure Repository Credentials
Argo CD needs a GitHub Personal Access Token (PAT) to get read access to your Git repositories. To store it securely in your cluster, let's create a secret via a manifest :
apiVersion: v1
kind: Secret
metadata:
  name: github-org-pat-creds
  namespace: argocd
  labels:
    argocd.argoproj.io/secret-type: repo-creds
type: Opaque
stringData:
  url: https://github.com/Local-pie/
  username: JudicaelPoumay
password: ghp_xxxxxxxxxxxxNotice the secret-type label. Argo looks for secrets with this label in its namespace. You can define more than one secret like this if you need access to multiple repos or organizations. For me, every repo related to my home lab is in one organization; which makes it easier since I don't have to create a secret for each new repo—but that is up to you.
Don't forget to replace ghp_xxxxxxxxxxxx with your PAT token. You can generate one by going to GitHub Settings > Developer Settings > Personal Access Tokens (see GitHub Documentation). For a simple setup, create a classic token with the appropriate read access.
For a real deployment, prefer a fine-grained token with repository-scoped read permissions rather than a classic PAT.
Then, apply it:
kubectl apply -f secret.yamlTip for beginners: Never commit secrets, even on a private GitHub; data leaks happen. If you want to store secrets in GitHub while remaining independent from their services, I suggest using solution like KubeSeal.
How To use Argo CD
This is it for the installation; now let's have a look at how this all works.
A simple application
Argo CD ensures your cluster state strictly mirrors your Git repository. Thus, you define your desired state in Git through a set of yaml files, and Argo CD continuously reconciles the live cluster state to match it.
To do this, we have to define a separate YAML file for Argo. Then, we apply it like any other YAML to the Kubernetes cluster. For example, this is my homepage Argo application definition:
apiVersion: argoproj.io/v1alpha1
kind: Application
metadata:
  name: homepage
  namespace: argocd
spec:
  project: default
  source:
    repoURL: https://github.com/Local-pie/homepage.git
    targetRevision: main
    path: k8s
  destination:
    server: "https://kubernetes.default.svc"
    namespace: utils-dev
  syncPolicy:
    automated:
      prune: true
      selfHeal: true
    syncOptions:
- CreateNamespace=trueMost of it is self-evident, so let's focus on some interesting parts:
- project: Projects are like GitHub Organization, they provide logical grouping, security controls and more. We will use default to simplify our life.
- targetRevision: This is the branch that Argo will pull and use as a source of truth.
- server: Points to your cluster. If Argo is self-hosted on the same cluster, it is
https://kubernetes.default.svc. - namespaces: Notice that the Application Manifest has a namespace, the same as Argo. But the homepage app itself has its own namespace that is different.
- syncPolicy: Defines how we want to sync.
- Prune: If a manifest is removed from your Git repo, Argo CD immediately prunes it from the cluster.
- selfHeal: Argo corrects any configuration drift, meaning if you manually delete something from the cluster, Argo will redeploy it right away.
- CreateNamespace: Means Argo is allowed to create the app namespace if it doesn't exist.
The path argument is particularly interesting because it contains the path to the folder of your Kubernetes Manifest. This can be a folder with just a bunch of YAML files, but it could also be a folder with a Helm-style setup; with a values.yaml, Chart.yaml, and templates/ folder. Argo will detect automatically which one you are using.
Note: The path is relative to the Git root, not wherever this Argo Application file is located. I personally like to keep my Argo Application definition in a separate
Argo/folder at the root.
Here is how you files can be structured :
# Simple Kubernetes setup
Argo/
└── app.yaml
k8s/
├── namespace.yaml
├── deployment.yaml
├── service.yaml
└── ingress.yaml

# Helm Kubernetes setup
Argo/
└── app.yaml
k8s/
├── Chart.yaml
├── values.yaml
└── templates/
    ├── namespace.yaml
    ├── ingress.yaml
    ├── deployment.yaml
    └── service.yaml
Once configured, apply the Argo file with kubectl apply like anything else so far. It should then appear in your Argo UI, and you should see Argo read your Git repos and pull and deploy the manifest. (Don't forget to commit them before ;) )
For basic projects, we could stop there. If all you need is to deploy some manifest, this might enough. Of course, we can do more with Argo.
Deploying To Multiple Environments
At some point, you will likely need to set up a separate pre-production environment, separate from real production. With Argo, you simply create a new Application file.
Either point it to a separate folder, or if using Helm, you can tell Argo which values.yaml to use and in which order with the Helm arguments. For example, here is a pre-prod configuration:
apiVersion: argoproj.io/v1alpha1
kind: Application
metadata:
  name: homepage
  namespace: argocd
spec:
  project: default
  source:
    repoURL: https://github.com/Local-pie/homepage.git
    targetRevision: develop
    path: k8s
    helm:
      valueFiles:
        - values.yaml
        - values-preprod.yaml
  destination:
    server: "https://kubernetes.default.svc"
    namespace: utils-dev
  syncPolicy:
    automated:
      prune: true
      selfHeal: true
    syncOptions:
- CreateNamespace=trueThen the k8s folder would look like this:
k8s/
├── Chart.yaml
├── values.yaml
├── values-prd.yaml
├── values-preprod.yaml
└── templates/
    ├── namespace.yaml
    ├── ingress.yaml
    ├── deployment.yaml
    └── service.yaml
Step 2: Install Argo Workflows
Moving to Argo CD is weird because it isn't really a replacement for GitHub Actions out of the box. Updating YAML files is nice, but what about if we need workflows to build images or do anything else? The solution is Argo Workflows!
Argo Workflows is basically just an orchestrator that can create and manage Kubernetes Jobs to do anything you like. In this case, we will be building and deploying images from GitHub repos.
Install Argo Workflows
Let's start by creating a values.yaml file.
server:
  # Disables HTTPS inside the pod
  secure: false

  # Bypasses the UI login
  extraArgs:
    - --auth-mode=server

  # Configures the Ingress
  ingress:
    enabled: true
    ingressClassName: "traefik"
    hosts:
      - workflow.home.arpa
    paths:
      - /
pathType: PrefixNotice that similarly to Argo CD, I am also disabling HTTPS because I don't need or want to deal with certificates here. In this YAML, I also define the Ingress for the web UI.
kubectl create namespace argo
helm install argo argo/argo-workflows -n argo --create-namespace -f values.yamlWhy create a new namespace and not use the Argo CD one? Separating them prevents security risks by stopping workflow from accessing Argo CD’s deployment secrets. It also lets you upgrade, manage, or delete either tool independently without breaking the other.
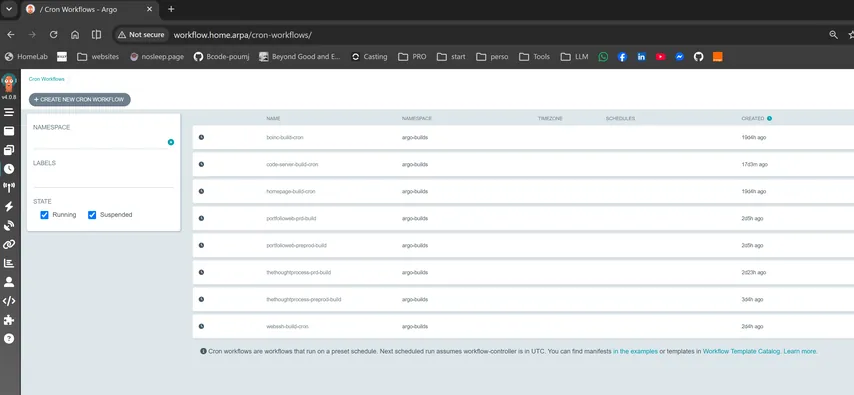
Once done, you should be able to access the UI within a minute or two. In this case, no password is needed because, in this example, I decided to set --auth-mode=server, which disables login. This can be fine as long as you have a secure local network and you know what you are doing. This is up to you.
Setting up a separate namespace for the Workflows
You don't want your workflows in the same namespace as the controller for two reasons.
- Security : Separate namespaces means smaller blast radius in case something goes wrong.
- Ressources : Workflows can be ressource heavy and could starve the controller, it's easier to set ressource quotas in a separate namespace.
Let's create a third namespace for workflows :
kubectl create namespace argo-builds
When we create workflows later, we will assign them to this namespace.
Configure repository credentials
Argo Workflows also need a GitHub PAT to read your Git repositories. Similarly to Argo CD, let's create a secret via a manifest :
apiVersion: v1
kind: Secret
metadata:
  name: github-org-pat-creds
  namespace: argo-builds
type: Opaque
stringData:
  url: https://github.com/Local-pie/
  username: JudicaelPoumay
password: ghp_xxxxxxxxxxxxNotice there is no label here, this is because we will be using this secret explicitly later. Argo Workflow won't look for it. Notice also that the namespace is the one where workflow will run.
Don't forget to save it securely and apply it.
Configure RBAC for workflows
Our workflows will need permissions to manage task results and deployments. This is yet another yaml manifest to apply to define a set of permissions needed :
apiVersion: rbac.authorization.k8s.io/v1
kind: Role
metadata:
  name: workflow-taskresult-manager
  namespace: argo-builds
rules:
  - apiGroups: ["argoproj.io"]
    resources: ["workflowtaskresults", "workflows", "cronworkflows"]
    verbs: ["create", "get", "list", "watch", "patch", "update"]
  - apiGroups: ["apps"]
    resources: ["deployments"]
    verbs: ["get", "patch", "list"]
---
apiVersion: rbac.authorization.k8s.io/v1
kind: RoleBinding
metadata:
  name: workflow-taskresult-binding
  namespace: argo-builds
roleRef:
  apiGroup: rbac.authorization.k8s.io
  kind: Role
  name: workflow-taskresult-manager
subjects:
  - kind: ServiceAccount
    name: default
namespace: argo-buildsSet resource quotas
Finally, workflows can get very heavy, especially on smaller clusters. You can limit the CPU resources for workflows in the argo-builds namespace to prevent resource exhaustion. For example, here is a ResourceQuota manifest capping CPU at 2 cores and concurrent jobs at 5 :
apiVersion: v1
kind: ResourceQuota
metadata:
  name: job-and-cpu-quota
  namespace: argo-builds
spec:
  hard:
    requests.cpu: "1"
    limits.cpu: "2"
count/jobs.batch: "5"Be especially careful when limiting concurrent jobs. Completed jobs still count toward the limit until Kubernetes deletes them. This can block new jobs from running until the old ones are cleaned up. Kubernetes isn't very flexible here, and there’s no precise way to distinguish between active and completed jobs in the limit configuration.
How to set up an Argo Workflow
A basic Workflow
Let’s start with the basics: a simple Argo Workflow to log "Hello World" in two stages.
apiVersion: argoproj.io/v1alpha1
kind: Workflow
metadata:
  generateName: two-stage-
  namespace: argo-builds
spec:
  entrypoint: main

  templates:
  # The main entrypoint now defines a sequence of steps
  - name: main
    steps:
    - - name: stage-one
        template: echo-message
        arguments:
          parameters:
          - name: message
            value: "Starting stage one... Hello!"

    - - name: stage-two
        template: echo-message
        arguments:
          parameters:
          - name: message
            value: "Stage one complete. Hello from stage two!"

  # A reusable template that accepts a parameter
  - name: echo-message
    inputs:
      parameters:
      - name: message
    container:
      image: alpine:latest
      command: ["sh", "-c"]
args: ["echo '{{inputs.parameters.message}}'"]Here is what’s happening:
generateName: Sets the workflow prefix. Argo appends a random suffix upon instantiation, allowing multiple instances without name conflicts. If you use a fixednameinstead, you can’t re-run it until the previous one is cleaned up.namespace: As mentioned, we use the dedicatedargo-buildsnamespace for our jobs.templates: Like functions in a programming language, these are reusable code blocks.echo-message: Uses the Alpine image to echo a parameterized message.stage-one&stage-two: Reuseecho-messageto output different text.
entrypoint: Specifies the main template to run (here,main).steps: Defines the workflow as a sequence of steps. In this case, our two stages.
There are many more parameters to customize, but you get the idea. I’ll show you a more complex example later.
So, how do you run this? You could trigger it manually via the Argo Web UI, CLI, or kubectl, but that’s not what we’re looking for. To automate this, we can set up triggers for workflows via Argo Events or the Argo REST API, which opens up some interesting setups.
A basic CronWorkflow
However, in our quest to replace GitHub Actions, there is another way: the CronWorkflow. As the name indicates, it is a workflow that runs on a schedule. I prefer this option since it allows me to avoid an external event source.
I set mine to run every 5 minutes for building and pushing new images. I chose this approach instead of Argo Event because it lets me remove GitHub Actions/webhooks from the critical path and keeps the setup self-contained. It isn't necessarily the most efficient solution.
Naturally, I don’t want to build every 5 minutes, as that would create a very heavy load on my cluster. However, there is a simple fix: simply check if you need to build at all. We’ll explore how to implement this check in the next sections.
Note that you can also trigger these manually on top of their scheduled runs via the web UI or CLI.
Here is an example of CronWorkflow:
apiVersion: argoproj.io/v1alpha1
kind: CronWorkflow
metadata:
  name: hello-world-cron
  namespace: argo-builds
spec:
  schedules:
    - "* * * * *"
  concurrencyPolicy: Forbid
  workflowSpec:
    entrypoint: hello
    templates:
      - name: hello
        container:
          image: alpine:latest
          command: [sh, -c]
args: ["echo 'Hello World'"]It’s nearly the same thing as we had before. Only a few things change:
- name: changes to
CronWorkflow - concurrencyPolicy: What happens if a new job wants to start while another isn't done? You can
Allow,Forbid(wait), orReplace(kill the old one). - schedules: defines a list of schedules via Cron Expressions, so you can have a complex multi-schedule workflow if needed.
If you don't know, Cron Expressions work like this:
* * * * *
│ │ │ │ │
│ │ │ │ └─── Day of the week (0 - 6, where 0 is Sunday)
│ │ │ └───── Month (1 - 12)
│ │ └─────── Day of the month (1 - 31)
│ └───────── Hour (0 - 23)
└─────────── Minute (0 - 59)Examples:
"0 12 * * *"# Runs every day at 12:00 PM"0 0 * * 1"# Runs every Monday at 12:00 AM"*/5 * * * *"# Runs every 5 minutes
The Architecture of the build pipeline
Now let’s build a real CI pipeline with this. My basic CI pipeline has three stages:
- Fetch Hash: I fetch the latest commit hash from the target branch without downloading the repository files. This is fast and avoids unnecessary work.
- Check Cache: I probe my container registry to check if an image with the commit hash tag already exists in the registry. If the image exists, the pipeline skips the build. This way I don’t constantly build images, but only when the git repo is updated.
- Build: If the hash has changed, I build the Docker image.
For debugging purposes, I also set a TTL strategy to clean up completed workflows automatically:
- Workflows that succeed are deleted after 180 seconds (3 minutes).
- Workflows that fail are kept for 3600 seconds (1 hour) for debugging.
- Reminder on Resource Quotas: As I have explained above, if you have set a job limit in your resource quotas, this can lead to namespace starvation. A failed job that isn’t doing anything still counts as a job, which can prevent new jobs from running.
Creating a Cluster Workflow Templates
Since I’m reusing the same CI pipeline everywhere, copy-pasting it would be a waste. Argo’s solution here is the WorkflowTemplate: define the pipeline once, re-use it everywhere. You can use ClusterWorkflowTemplate for cross-namespace usage, but since all our workflows are in argo-builds, we don't need that.
A WorkflowTemplate looks just like a normal workflow, except it’s not meant to run on its own. The key difference? They don’t use generateName because they need to be referenced by name.
Here is the workflow I described earlier. It’s complex (read it if you dare) but it’s a perfect example of Argo’s power.
Notable elements are:
- arguments: These are the variables passed into the template (we’ll dive into this next).
- volumes and containerSet: We mount
emptyDirvolumes at/workspaceand/tmp. In standard Argo workflows, steps run in separate pods, which means you have to juggle sidecars or push data to storage just to share files. With mycontainerSet, multiple containers run inside the same Pod. This lets them share state locally—like writing thegit shato/tmp/shaor sharing the repo in/workspace/srcwithout any of that overhead. - Conditional Execution: Step 2 (
check-registry) writestrueorfalseto/tmp/build_needed. Step 3 (buildkit-build) checks this file at runtime:if [ "$(cat /tmp/build_needed)" = "false" ]; then exit 0; fi.
This isn't the most beautiful workflow you will ever see but it works. Here it is :
apiVersion: argoproj.io/v1alpha1
kind: WorkflowTemplate
metadata:
  name: build-template
spec:
  # Define default values that can be overridden by the calling Workflow / CronWorkflow
  arguments:
    parameters:
      - name: repo-url
        value: "github.com/Local-pie/homepage.git"
      - name: git-branch
        value: "main"
      - name: image-name
        value: "zot.home.arpa/homepage"
      - name: image-tag-prefix
        value: "preprod"
      - name: target-platform
        value: "linux/arm64"
  ttlStrategy:
    secondsAfterSuccess: 180
    secondsAfterFailure: 3600
  entrypoint: build-pipeline
  volumes:
    - name: workspace
      emptyDir: {}
    - name: tmp
      emptyDir: {}
  templates:
    - name: build-pipeline
      containerSet:
        volumeMounts:
          - mountPath: /workspace
            name: workspace
          - mountPath: /tmp
            name: tmp
        containers:
          # 1. Instantly fetch the latest commit hash without downloading files
          - name: get-sha
            image: docker.io/alpine/git:v2.54.0
            resources:
              requests:
                cpu: "10m"
              limits:
                cpu: "50m"
            env:
              - name: GIT_USERNAME
                valueFrom:
                  secretKeyRef:
                    name: "github-org-pat-creds"
                    key: username
              - name: GIT_PASSWORD
                valueFrom:
                  secretKeyRef:
                    name: "github-org-pat-creds"
                    key: password
            command: [sh, -c]
            args:
              - |
                git ls-remote https://${GIT_USERNAME}:${GIT_PASSWORD}@{{workflow.parameters.repo-url}} {{workflow.parameters.git-branch}} | awk '{print $1}' > /tmp/sha
                echo "Target Hash: $(cat /tmp/sha)"

          # 2. Check if this hash already exists in the registry
          - name: check-registry
            image: quay.io/skopeo/stable:latest
            resources:
              requests:
                cpu: "10m"
              limits:
                cpu: "50m"
            dependencies: [get-sha]
            command: [sh, -c]
            args:
              - |
                COMMIT_HASH=$(cat /tmp/sha)
                TAG_NAME="{{workflow.parameters.image-tag-prefix}}-$COMMIT_HASH"
                echo "Checking if tag $TAG_NAME exists..."
                if skopeo inspect --tls-verify=false docker://{{workflow.parameters.image-name}}:$TAG_NAME > /dev/null 2>&1; then
                  echo "Tag exists. Skipping build."
                  echo "false" > /tmp/build_needed
                else
                  echo "Tag missing. Triggering build."
                  echo "true" > /tmp/build_needed
                fi

          # 3. Build and push using BuildKit
          - name: buildkit-build
            image: moby/buildkit:v0.19.0
            securityContext:
              privileged: true
            resources:
              requests:
                cpu: "200m"
              limits:
                cpu: "1"
            dependencies: [check-registry]
            env:
              - name: GIT_USERNAME
                valueFrom:
                  secretKeyRef:
                    name: "github-org-pat-creds"
                    key: username
              - name: GIT_PASSWORD
                valueFrom:
                  secretKeyRef:
                    name: "github-org-pat-creds"
                    key: password
            command: [sh, -c]
            args:
              - |
                if [ "$(cat /tmp/build_needed)" = "false" ]; then
                  echo "Skipping buildkit build."
                  exit 0
                fi

                # Extract registry domain dynamically for insecure configuration
                REGISTRY_DOMAIN=$(echo "{{workflow.parameters.image-name}}" | cut -d'/' -f1)

                # Create buildkitd config for insecure registry access
                mkdir -p /etc/buildkit
                cat > /etc/buildkit/buildkitd.toml <<EOF
                [registry."$REGISTRY_DOMAIN"]
                  http = true
                  insecure = true
                EOF

                # Start buildkitd in background with config
                nohup buildkitd --oci-worker-snapshotter=native --config /etc/buildkit/buildkitd.toml > /tmp/buildkitd.log 2>&1 &
                BUILDKITD_PID=$!

                echo "Started buildkitd (PID: $BUILDKITD_PID), waiting for readiness..."

                # Wait up to 60s for daemon socket to appear and be ready
                READY=false
                for i in $(seq 1 60); do
                  if [ -S /run/buildkit/buildkitd.sock ] && buildctl connections 2>/dev/null | head -n1 >/dev/null; then
                    echo "BuildKit daemon is ready after ${i}s."
                    READY=true
                    break
                  fi
                  sleep 1
                done

                if [ "$READY" = false ]; then
                  echo "ERROR: BuildKit daemon failed to start!"
                  cat /tmp/buildkitd.log
                  exit 1
                fi

                # Clone the repo into a local directory
                git clone https://${GIT_USERNAME}:${GIT_PASSWORD}@{{workflow.parameters.repo-url}} /workspace/src --depth 1 --branch {{workflow.parameters.git-branch}} \
                  2>&1 || { echo "ERROR: git clone failed"; exit 1; }

                COMMIT_HASH=$(cd /workspace/src && git rev-parse HEAD)
                echo "$COMMIT_HASH" > /tmp/sha

                # Write build command using the parameters (Using standard string concatenation instead of printf %% to avoid shell parsing bugs)
                echo "buildctl build --frontend=dockerfile.v0 --local context=/workspace/src --local dockerfile=/workspace/src --opt filename=Dockerfile --opt platform={{workflow.parameters.target-platform}} --opt provenance=false --output \"type=image,name={{workflow.parameters.image-name}}:{{workflow.parameters.image-tag-prefix}}-$COMMIT_HASH,push=true,compression=gzip,oci-mediatypes=true\" --import-cache type=registry,ref={{workflow.parameters.image-name}}/cache --export-cache type=registry,mode=max,ref={{workflow.parameters.image-name}}/cache,oci-mediatypes=true" > /tmp/build.sh

                # Run build for parameterized tag
                sh /tmp/build.sh 2>&1 || exit 1

                # Retag and push prefix-latest using the cached build
                sed "s/{{workflow.parameters.image-tag-prefix}}-.\*/{{workflow.parameters.image-tag-prefix}}-latest/g" /tmp/build.sh > /tmp/build_latest.sh
sh /tmp/build_latest.sh 2>&1 || exit 1Example of a CronWorkflow for CICD
Now that we have a template, we can reuse it across multiple projects. It accepts parameters for the repository URL, git branch, image name, image tag prefix, and target platform. This is how I use it in practice in all of my projects where I need to build images.
Compared to the above mess, this feels really neat and clear :
apiVersion: argoproj.io/v1alpha1
kind: CronWorkflow
metadata:
  name: {{ .Values.app.namespace }}-build
  namespace: argo-builds
spec:
  schedule: "*/5 * * * *"
  concurrencyPolicy: Forbid
  workflowSpec:
    workflowTemplateRef:
      name: build-template
    arguments:
      parameters:
        - name: git-branch
          value: "{{ .Values.git.branch }}"
        - name: image-tag-prefix
          value: "{{ .Values.image.prefix }}"
        - name: repo-url
          value: "github.com/Local-pie/the-thought-process.git"
        - name: image-name
          value: "zot.home.arpa/thethoughtprocess"
You can override any parameter when you create a CronWorkflow that references this template. If you omit a parameter, it will use the default value.
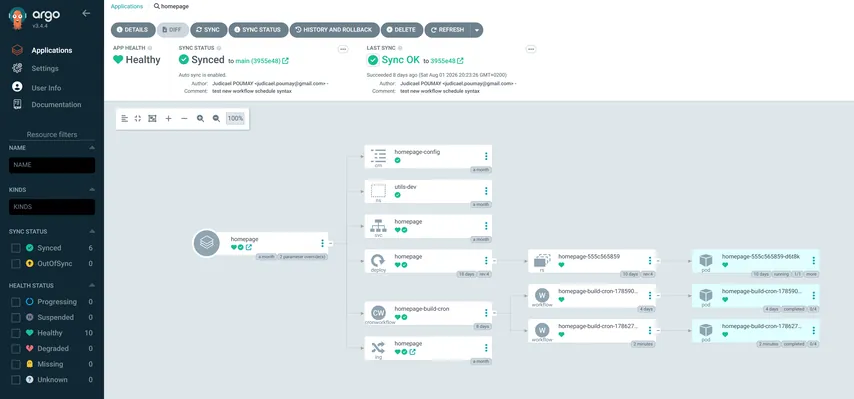
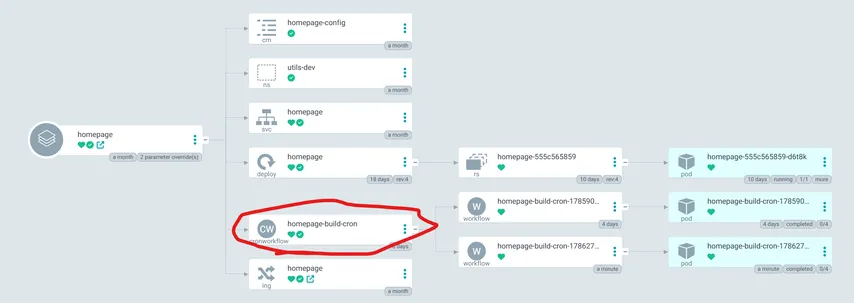
I like to save my workflows inside the same k8s folder that is watched by Argo CD. So if I update the workflow, Argo CD updates it. It also shows up in the Argo CD UI :
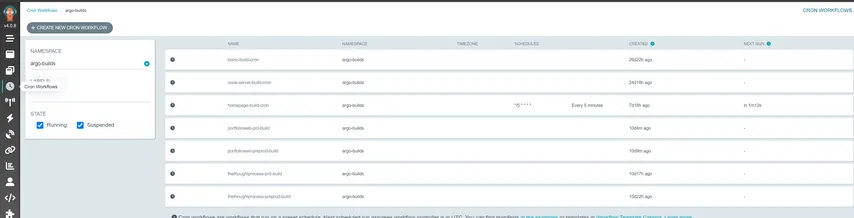
You should also see it in Argo Workflow UI being listed under Cron Workflow :
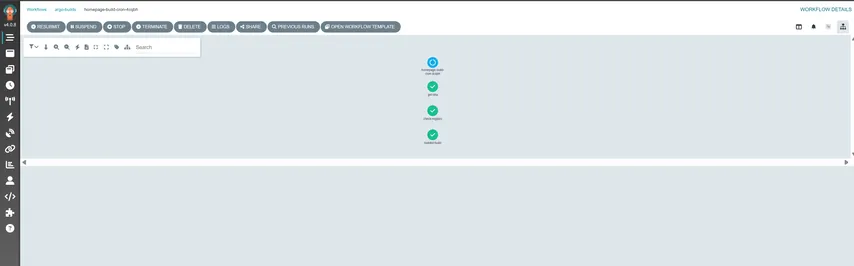
You can also see how it runs :
Step 3: Install Argo CD Image Updater
We are now close to the end, yet we are missing one last step.
We could force update the deployed image using post-build workflows, but this breaks the GitOps model by bypassing Git. Instead, ArgoCD Image Updater automates this process natively. It polls our container registry for new images and writes the new tags right back to Git, restoring the GitOps flow.
The way it works is straightforward: the updater monitors your registry for new tags and updates the deployed images automatically. Let’s set that up.
Install the Image Updater
First we install Argo Image Updater
helm install argocd-image-updater argo/argocd-image-updater --namespace argocdIf you have followed my self-hosted zot setup, you will also need to override the config map to allow pulling from your insecure Zot. For example :
apiVersion: v1
kind: ConfigMap
metadata:
  name: argocd-image-updater-config
  namespace: argocd
data:
  registries.conf: |
    registries:
    - name: Zot
      api_url: http://zot.home.arpa
      prefix: zot.home.arpa
insecure: trueHow it works
Image Updater Annotations
Argo Image Updater acts as the bridge between your build process and Argo CD. It monitors your container registry for new images and automatically updates the image tags in your Argo CD Application manifests.
Note: Argo CD Image Updater only works with applications built using Helm, Kustomize, or a Config Management Plugin (CMP). It does not support applications built from plain, raw YAML files. The updater updates images by passing parameter overrides to the templating engine (Helm, Kustomize, or CMP). Plain YAML has no parameter injection system, so the updater has no mechanism to modify it.
To enable this, you simply add an annotation to your Argo CD Application manifest specifying the update strategy:
metadata:
  annotations:
    argocd-image-updater.argoproj.io/image-list: my-app-registry=zot.home.arpa/my-app-registry
    argocd-image-updater.argoproj.io/my-app-registry.update-strategy: newest-build
    argocd-image-updater.argoproj.io/my-app-registry.allow-tags: regexp:^prd-[a-f0-9]+$
argocd-image-updater.argoproj.io/write-back-method: argocdLet me explain the key parts:
image-list: Defines what your app image registry repository is.update-strategy: Defines which image to use. Here,newest-buildindicates the latest image.allow-tags: Regex to filter images with names likeprd-a1b2c3....- Note: The allow-tags regex requires the tag in your deployment manifest to start with prd-. If your manifest uses latest, the updater will ignore it because latest doesn’t match your regex. You must use a mutable placeholder like prd-a1b2c3.
write-back-method: Defines how the updater commits the change.git: We commit the change to Git and expect Argo CD to pick up the change.- Git remains the source of truth but adds automated commits in your history
- Incompatible with my CronWorkflow strategy since a new commit would trigger a new build, thus leading to an infinite loop.
argocd: We tell Argo to update the image directly.- No automated commits but git isn't exactly the source of truth anymore
These annotations are placed in your Argo CD application manifest like this:
apiVersion: argoproj.io/v1alpha1
kind: Application
metadata:
  annotations:
    argocd-image-updater.argoproj.io/image-list: my-app-registry=zot.home.arpa/my-app-registry
    argocd-image-updater.argoproj.io/my-app-registry.update-strategy: newest-build
    argocd-image-updater.argoproj.io/my-app-registry.allow-tags: regexp:^prd-[a-f0-9]+$
    argocd-image-updater.argoproj.io/write-back-method: argocd
  name: homepage
  namespace: argocd
spec:
  project: default
  source:
    repoURL: https://github.com/Local-pie/homepage.git
    targetRevision: main
    path: k8s
  destination:
    server: 'https://kubernetes.default.svc'
    namespace: utils-dev
  syncPolicy:
    automated:
      prune: true
      selfHeal: true
    syncOptions:
- CreateNamespace=trueMulti-image deployment
If you have multiple images in your deployment, you can configure Argo CD Image Updater to handle them separately. In this example, I use digest for the backend, which tells the updater to watch for changes in the image digest rather than a specific tag.
metadata:
  annotations:
    # 1. Define multiple images using aliases separated by commas
    argocd-image-updater.argoproj.io/image-list: fe=zot.home.arpa/my-app-registry/frontend, be=zot.home.arpa/my-app-registry/backend

    # --- Frontend Rules (alias: fe) ---
    argocd-image-updater.argoproj.io/fe.update-strategy: newest-build
    argocd-image-updater.argoproj.io/fe.allow-tags: regexp:^prd-fe-[a-f0-9]+$

    # --- Backend Rules (alias: be) ---
    argocd-image-updater.argoproj.io/be.update-strategy: digest
    argocd-image-updater.argoproj.io/be.allow-tags: regexp: dev

    # --- Global Settings ---
argocd-image-updater.argoproj.io/write-back-method: argocdFor completeness, your associated deployment would look like this :
apiVersion: apps/v1
kind: Deployment
metadata:
  name: my-app
  namespace: default
spec:
  replicas: 1
  selector:
    matchLabels:
      app: my-app
  template:
    metadata:
      labels:
        app: my-app
    spec:
      containers:
        # Frontend Container
        - name: frontend

          #Notice the placeholder `prd-fe-1234567`
          #It doens't point to any image
          #but respect the expected format in our regex
          #Otherwise, Image Updater won't be happy
          image: zot.home.arpa/my-app-registry/frontend:prd-fe-1234567
          ports:
            - containerPort: 80

        # Backend Container
        - name: backend
          image: zot.home.arpa/my-app-registry/backend:dev
          ports:
- containerPort: 8080Debugging Image Updater
Image updater is the only component without a good visual feedback as we have no UI and no UI integration in Argo CD. It just works in the background. If there are any issues, the best way is to look at the logs.
The Complete GitOps Loop
At this point, we have all three pieces of the puzzle:
- Argo CD deploys Kubernetes manifests defined in Git.
- Argo Workflows builds and pushes our container images.
- Argo CD Image Updater watches the registry for new images.
Let's walk through the complete flow.
1. A commit is pushed to Git
Everything starts with a change to the application source code. For example, I modify my application and push the changes to the main branch.
2. Argo CD detects the change
Argo CD continuously watches the repository and detects that the desired state has changed. If the Kubernetes manifests themselves have changed, Argo CD can immediately synchronize them with the cluster. For application code changes, however, we still need to build a new container image. This is where Argo Workflows comes in.
3. Argo Workflow builds the image
Our CronWorkflow periodically checks the repository for new commits. It retrieves the latest commit hash and checks whether an image for that commit already exists in the registry. If it doesn't, the workflow builds the image and pushes it to Zot.
For example:
zot.home.arpa/homepage:preprod-8f31c2aAt this point, the new image exists in the registry.
4. The new image becomes the new version
Argo CD Image Updater monitors the registry for new images and directly updates the image reference used by the application.
What’s Next?
We are done! I can't say this was as easy as setting up a self hosted GitHub Runner but it wasn't too bad.
Managing Stateful Applications: While Argo CD excels at managing your application's desired state, the underlying persistent data requires a separate, robust solution. For a GitOps-friendly and cloud-native storage backend, consider installing Longhorn to manage your volumes, snapshots, and backups.
The Argo ecosystem is quite modular and if you want to go further, you can check :
- Argo Rollouts : Go beyond simple deployments. Implement canary or blue-green strategies for zero-downtime releases. View official docs →
- Argo Events : Transition from scheduled CronWorkflows to event-driven pipelines that react to webhooks or cloud events. Argo Events documentation →
- Argo CD Notifications : Stay in control by configuring alerts in Slack or Teams. Configuration guide →
- And much more!