How to Set up Azure SSO in FastAPI with Microsoft Entra ID

In this comprehensive guide, we’ll walk through the entire process of setting up Azure Single Sign-On (SSO) with FastAPI, from configuring your Microsoft Entra ID application to implementing the authentication flow in your FastAPI application.
Note: Microsoft has renamed Azure Active Directory (Azure AD) to Microsoft Entra ID. This guide will use the new terminology, but you may still encounter the old names in some documentation and online articles.
A summary of the Microsoft Entra ID Authentication Flow
Before diving into the implementation, it’s important to understand how the whole authentication process works.
- A user attempts to access your FastAPI application
- They are redirected to Microsoft’s login page.
- After successful authentication, Microsoft Entra ID returns an authorization code to your application
- Your app exchange this code for an access tokens containing the user information.
- Store the token in a signed session cookie so the user only has to login once.
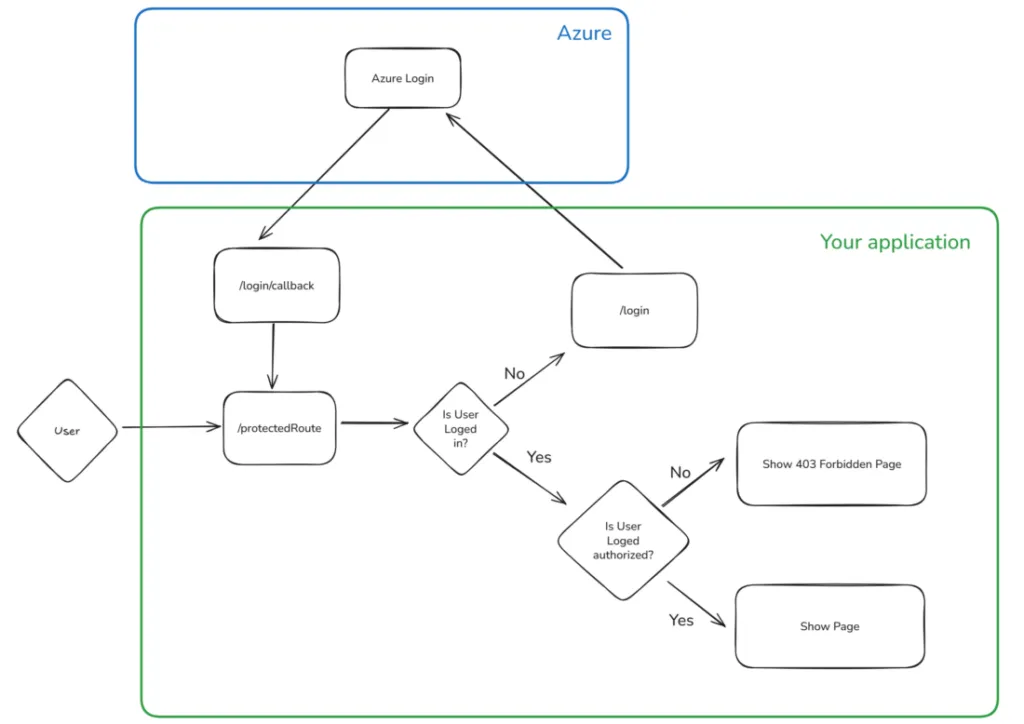
The beauty of this approach is that your application never handles user passwords directly. All authentication is managed by Microsoft’s secure infrastructure, and you simply validate the tokens they provide. Moreover, if the user is already signed in with Microsoft, these redirections may happen almost invisibly.
What we will build
We will build a small FastAPI application with:
/login: redirects the user to Microsoft Entra ID/login/callback: receives the authorization code from Microsoft Entra ID/protected: a route that requires the user to be logged in/roleProtected: a route that requires the user to have theAdminrole/unprotected: a public routeSessionMiddlewarefor SSO session cookie management
We will setup the Azure Infrastructure including
App Registration: to provide an identity to our applicationRedirect URLs: to inform Azure to connect to/login/callbackafter login
Prerequisites
To follow this tutorial, you need:
- Python 3.10+
- A Microsoft Azure account
- Access to Microsoft Entra ID
- Basic knowledge of FastAPI
- A local FastAPI project
Step 1: Setting up Azure
1.1 Create an Azure App Registration
First, we need to set up an app registration before implementing SSO on our application. In a production setting, it is advised to do this using IaC (Infrastructure-as-code) pipelines, but for this tutorial, we will configure it manually to keep the tutorial simple.
The app registration will be the identity of your application in Azure. They can be used for a variety of purposes, such as role-based access for Azure resources. Here we will only use it for SSO. Select app registration in the Azure Portal and click “Register an application”.
To create your application, simply choose a name and select the type of supported accounts. This is rather self-explanatory as you can see below.
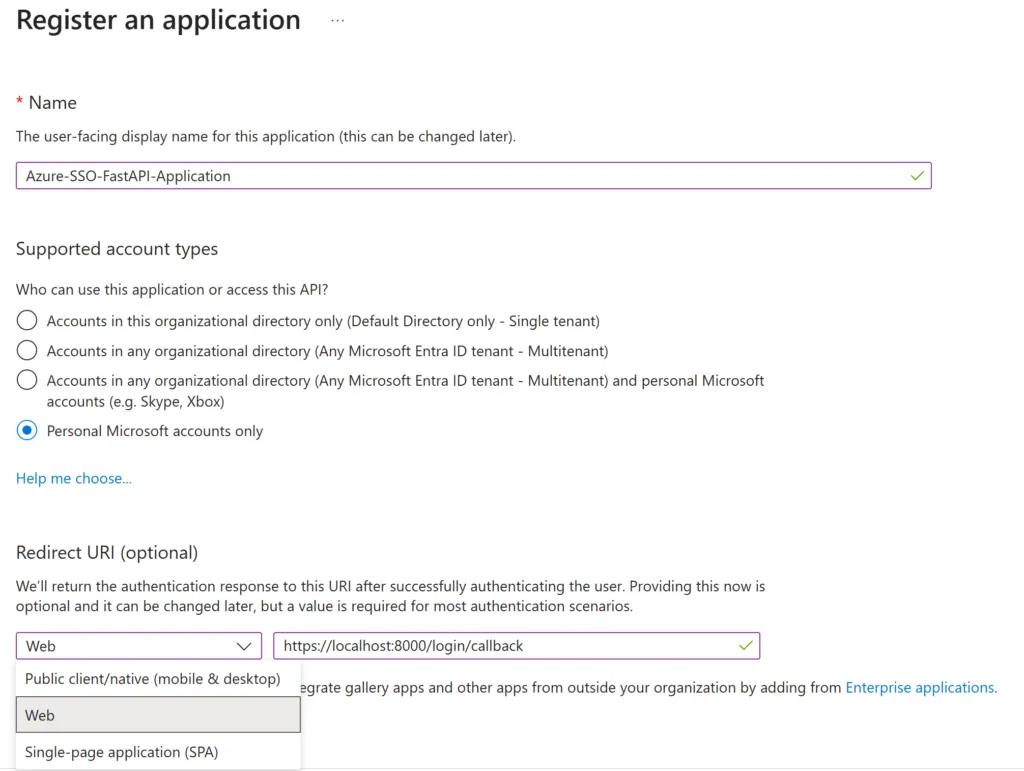
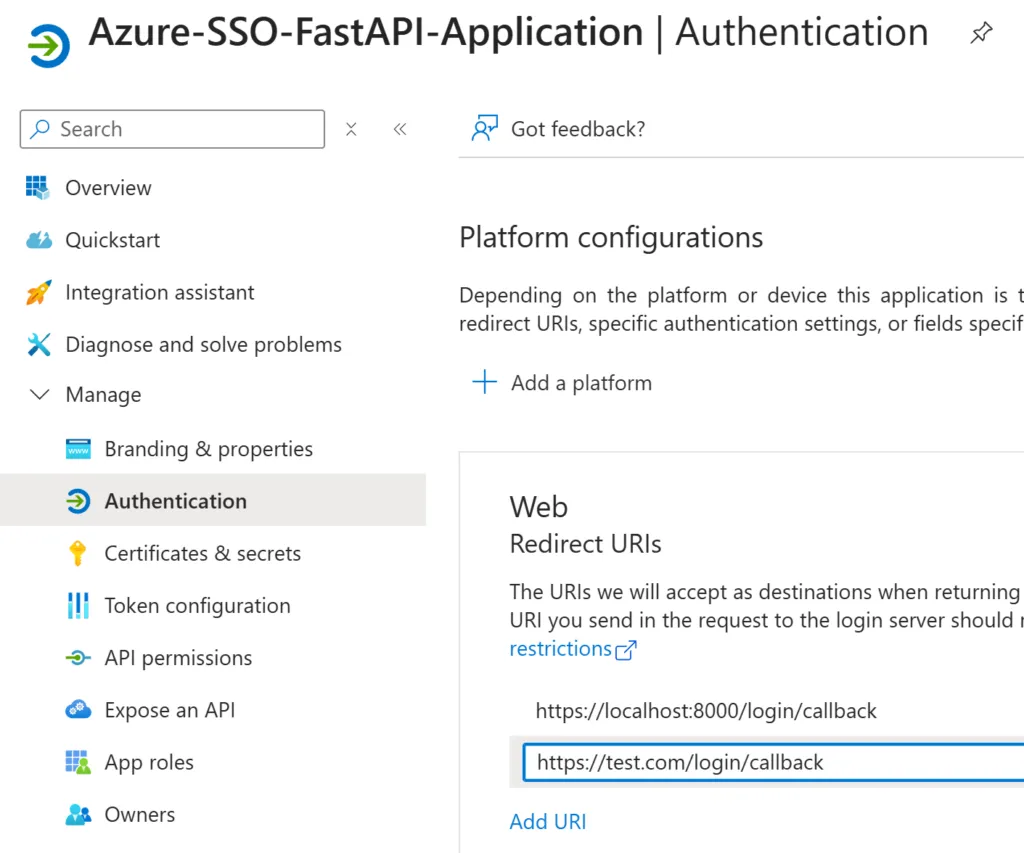
The Redirect URI is the more interesting part. Here, you will define the URL that Azure will be allowed to use after the login process. This is a security measure used by Azure to ensure that your tokens cannot be stolen with a man-in-the-middle attack to some other address.
The Redirect URI type for this tutorial will be Web, which is the generic solution for a web API.
After this, you can then create your app registration.
1.2 Optional: Add more Redirect URLs
Note: After creation, it will be possible to list multiple Redirect URIs. This is useful for listing a local URL for development and a production URL, for example. For local development, Microsoft Entra ID allows plain HTTP on localhost, so you can safely add http://localhost:8000/login/callback as a redirect URI. Simply go to the authentication tab and click “Add URI”, add a new URL, and click “Save”.
1.3 Create a secret
Ok we are nearly done, we just have to create a client secret. This will act as a password to use the app registration in our application.
- Click on the “Certificates & Secrets” tab
- Under the Client secrets section, click “+ New client secret.”
- Enter a description (e.g., API access key) and choose an expiration period
- Click “Add.”
- Copy the value immediately — it will only be shown once.
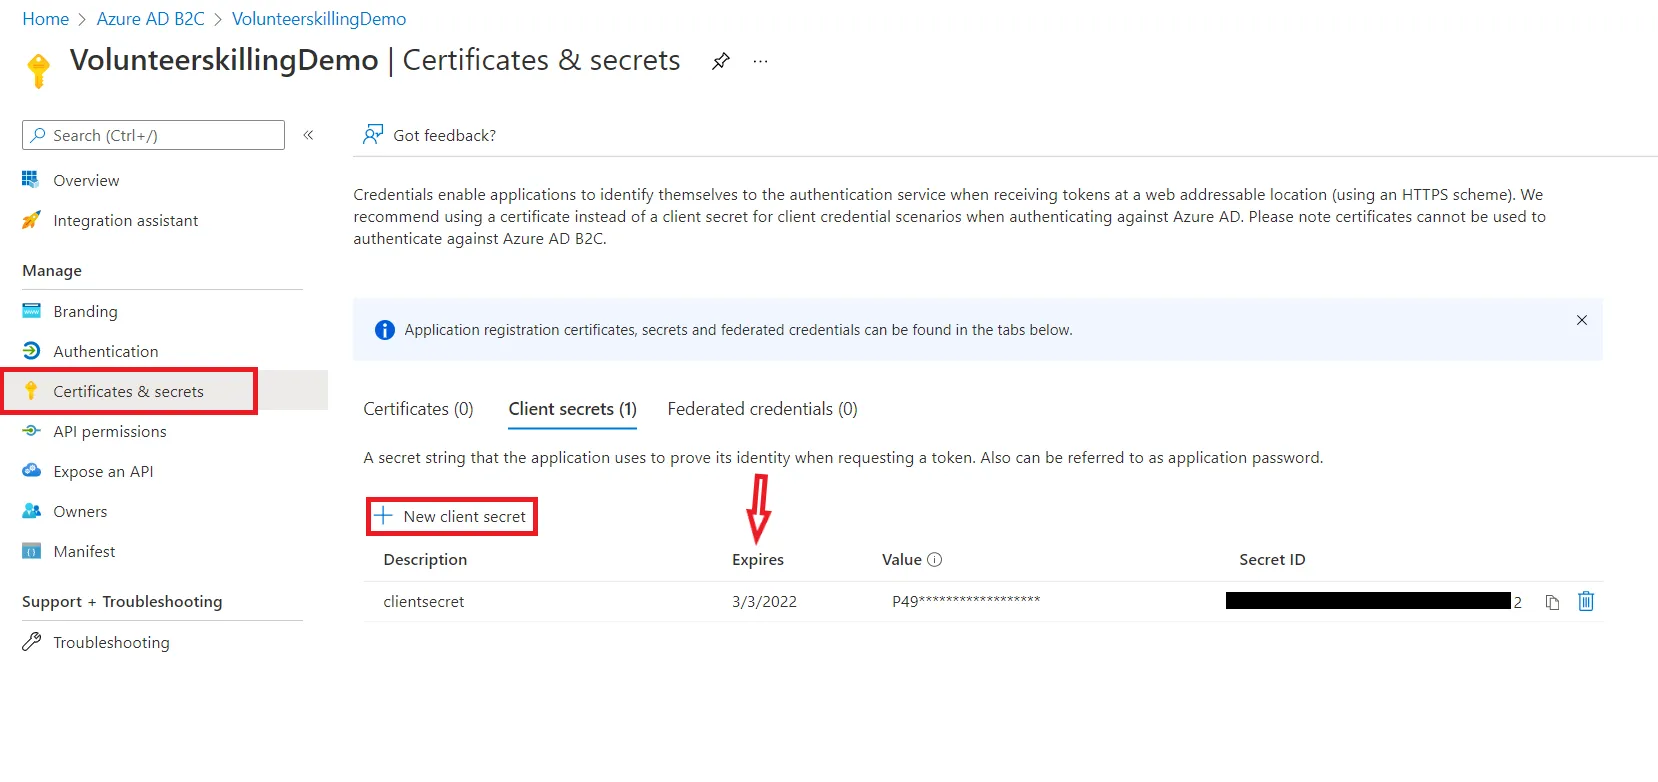
Again, in practice, you would do this using some kind of IaC pipeline and store the secret in a key vault after creating it automatically. Also, client secrets need to be renewed, so don’t forget to schedule a moment in time to renew them or set up an automatic renewal process via IaC.
1.4 Collect the client ID & Tenant ID
Go to the overview page and get the Client ID and Tenant ID (also called Directory ID). You now have the 3 strings that we will need to connect to Azure.
1.5 Create App Roles
To use role-based access control (RBAC) in your FastAPI application, you'll need to define those roles in Microsoft Entra ID.
- Go to your App Registration in the Azure Portal.
- Select App roles from the left-hand menu.
- Click + Create app role.
- Set the Display name to "Admin", the Value to "Admin", and choose who can be assigned this role (e.g., Users/Groups).
- Apply the role and make sure it is enabled.
When a user with this role assigned logs in, the ID token will include a roles claim containing "Admin" as we will see in the implementation section.
Step 2: Project Setup and Dependencies
Here is the project structure we will be building:
azure-sso-fastapi/
├── main.py
├── requirements.txt
└── .envOkay, now, let’s set up our dependencies. First, create a requirements.txt file with the following content:
    fastapi
    httpx
    python-dotenv
    python-jose # Used for JWT validation
    msal # Used for Microsoft authentication
    uvicorn
Then, install them using pip:
pip install -r requirements.txt
Step 3: Implement Azure SSO in FastAPI
Time to code! We will create a single main.py file for this tutorial. In practice, you may want to separate the auth code and routes in a different file with the FastAPI router feature, but this is out of the scope of this article.
3.1 Imports and Important Initializations
First, we will need to import a bunch of things :
import httpx
import secrets
import os
from jose import jwt, JWTError
from typing import Optional, Dict, Any, List
from datetime import datetime, timedelta
from fastapi import FastAPI, Depends, HTTPException, status, Request
from fastapi.responses import RedirectResponse, JSONResponse
from fastapi.security import HTTPBearer, HTTPAuthorizationCredentials
from dotenv import load_dotenv
import msal
from starlette.middleware.session import SessionMiddlewareThen, we will have to define a few elements, as we can see in the code below. What matters most is the msal_client, which will represent the app registration in code. Also note that we add SessionMiddleware to the middlewares of FastAPI. This will come in handy later.
Warning: Starlette's SessionMiddleware stores data in a client-side signed cookie. Browsers limit cookie sizes to around 4KB. Avoid storing raw access tokens or large amounts of user data in the session, or the cookie will silently fail to save. Store only essential identity data (like user ID, name, and roles).
AZURE_CLIENT_ID = # Retrieved from previous step
AZURE_CLIENT_SECRET = # Retrieved from previous step
AZURE_TENANT_ID = # Retrieved from previous step
AZURE_REDIRECT_URI = # The redirect URL you defined in the app registration
SECRET_KEY = # Random value you choose for securing the session
AUTHORITY = f"https://login.microsoftonline.com/{AZURE_TENANT_ID}"
SCOPE = ["User.Read"] # This scope will be used to say ( we want to access user info)

app = FastAPI()

# Add session middleware
# NOTE: In production, ensure 'https_only=True' and 'samesite="none"' for cross-site SSO redirects.
app.add_middleware(
    SessionMiddleware,
    secret_key=SECRET_KEY,
    https_only=True,
    samesite="none"
)

# Initialize MSAL Confidential Client
msal_client = msal.ConfidentialClientApplication(
    client_id=AZURE_CLIENT_ID,
    authority=AUTHORITY,
    client_credential=AZURE_CLIENT_SECRET,
)For local development over plain HTTP, change the middleware temporarily to:
app.add_middleware(
    SessionMiddleware,
    secret_key=SECRET_KEY,
    https_only=False,
    same_site="lax",
)Finally, you will have to define a bunch of environment variables, here is a sample .env file to fill:
AZURE_CLIENT_ID=your-client-id
AZURE_CLIENT_SECRET=your-client-secret
AZURE_TENANT_ID=your-tenant-id
AZURE_REDIRECT_URI=https://your-domain.com/login/callback
SECRET_KEY=replace-this-with-a-long-random-secret
3.2 Login & Callback endpoints for Azure SSO
Now let’s write the basic authorization endpoints that will allow users to log in using Microsoft Entra ID (Azure AD) and handle the OAuth callback.
The route /login will redirect the user to the Microsoft login page. After logging in to their Microsoft account, the user will be redirected to /login/callback. The exact callback link was provided in /login with the variable AZURE_REDIRECT_URI. If the user is already logged in to Microsoft, then the user won’t even see the redirection front-end side.
In the /login/callback, we exchange our code for a user token. Again, this is a security measure to avoid sending the token over the internet. Notice that we then store our token in the user session. This is essential; otherwise, the token will only exist until the next redirection. Without this, we can enter into an infinite redirection loop.
At the end, the callback route redirects the user to the protected route. This is a simplified implementation. A more flexible approach is to store the address the user tried to reach in the session. Then, retrieve it in the callback to ensure we can come back where we came from.
# --- API Endpoints ---

@app.get("/login")
async def login(request: Request):
    """
    Initiate the Microsoft Entra ID login flow.
    Stores the state in the session.
    """
    state = secrets.token_urlsafe(32)
    request.session["state"] = state

    authorization_url = msal_client.get_authorization_request_url(
        scopes=SCOPE,
        state=state,
        redirect_uri=AZURE_REDIRECT_URI
    )
    return RedirectResponse(url=authorization_url)

async def get_microsoft_jwks():
    """Fetch the public keys used to sign the tokens."""
    async with httpx.AsyncClient() as client:
        response = await client.get(
            f"https://login.microsoftonline.com/{AZURE_TENANT_ID}/discovery/v2.0/keys"
        )
        return response.json()

@app.get("/login/callback")
async def callback(code: str, state: str, request: Request):
    """
    Handle the OAuth callback from Microsoft Entra ID.
    Stores the user's token and info in the session.
    """
    # Verify the state to prevent [CSRF attacks](https://cheatsheetseries.owasp.org/cheatsheets/Cross-Site_Request_Forgery_Prevention_Cheat_Sheet.html)
    if state != request.session.get("state"):
        raise HTTPException(status_code=400, detail="Invalid state parameter")

    request.session.pop("state", None)

    token_response = msal_client.acquire_token_by_authorization_code(
        code=code,
        scopes=SCOPE,
        redirect_uri=AZURE_REDIRECT_URI
    )

    if "error" in token_response:
        raise HTTPException(
            status_code=status.HTTP_401_UNAUTHORIZED,
            detail=token_response.get("error_description", "Failed to acquire token")
        )

    # Fetch public keys from Microsoft to verify the token
    jwks = await get_microsoft_jwks()

    # Get the unverified header to find the correct key
    unverified_header = jwt.get_unverified_header(token_response['id_token'])
    rsa_key = {}
    for key in jwks["keys"]:
        if key["kid"] == unverified_header["kid"]:
            rsa_key = {
                "kty": key["kty"],
                "kid": key["kid"],
                "use": key["use"],
                "n": key["n"],
                "e": key["e"]
            }
            break

    if not rsa_key:
        raise HTTPException(status_code=401, detail="Invalid token: Public key not found")

    try:
        # The [id_token](https://jwt.io/introduction/) contains user claims
        # Note: We must verify the signature locally using the fetched public key.
        # It's a security risk to skip validation (e.g. options={"verify_signature": False}).
        id_token_claims = jwt.decode(
            token_response['id_token'],
            rsa_key,
            algorithms=["RS256"],
            audience=AZURE_CLIENT_ID,
            issuer=f"https://login.microsoftonline.com/{AZURE_TENANT_ID}/v2.0"
        )
    except JWTError as e:
        raise HTTPException(status_code=401, detail=f"Token validation failed: {str(e)}")

    # Store user information in the session
    request.session["user"] = {
        "id": id_token_claims.get("oid"),
        "name": id_token_claims.get("name"),
        "email": id_token_claims.get("preferred_username"),
        "roles": id_token_claims.get("roles", []),
    }

return RedirectResponse(url="/protected")3.3 Create FastAPI dependencies
Let’s create a few utility functions. We will use these as dependencies with FastAPI’s Depends feature. It allows FastAPI to automatically resolve and inject the results of these utilities where needed, making your code more modular and cleaner.
These functions will simply try to get the user object or roles from the current session. If it doesn’t exist, it will raise an error flag as a 302 HTTPException. This will be sent to the web browser, which will understand that it needs to do a redirection. In this case, to the /login endpoint.
# --- Authentication Logic ---
# (We don't need manual token verification with sessions, but this can be useful for other purposes)

# --- Dependencies ---
def require_auth(request: Request):
    """
    Dependency to protect an endpoint.
    Raises an exception if the user is not authenticated.
    """
    user = request.session.get("user")
    if not user:
        response = RedirectResponse(url="/login", status_code=302)
        raise HTTPException(
            status_code=response.status_code,
            headers=response.headers
            )
    return user

def require_roles(required_roles: List[str]):
    """
    Dependency factory to check for required roles in the session.
    """
    def role_checker(
        user: Dict[str, Any] = Depends(require_auth)
    ):
        user_roles = user.get("roles", [])
        if not any(role in user_roles for role in required_roles):
            response = RedirectResponse(url="/login", status_code=302)
            raise HTTPException(
                status_code=response.status_code,
                headers=response.headers
                )
        return user
return role_checker3.4 Let’s create some actual protected routes with FastAPI
Great, now that we have the authorization logic handled, we can use it to serve useful endpoints in our applications. Here are a few examples that require a user token, a specific role, or no logging at all. Notice how we use the FastAPI Depends() feature to seamlessly integrate authentication in our endpoints.
@app.get("/protected")
async def protected_endpoint(
    user = Depends(require_auth)
):
    """
    A protected endpoint that requires authentication via session.
    """

    return {
        "message": f"Hello, {user.get('name')}! This is protected data.",
        "user_details": user
    }

@app.get("/roleProtected", dependencies=[Depends(require_roles(["Admin"]))])
async def role_protected_endpoint(
    user = Depends(require_auth)
):
    """
    An endpoint protected by role 'Admin'.
    """

    return {
        "message": f"Welcome, Admin {user.get('name')}!",
        "detail": "You have access to this role-protected data."
    }

@app.get("/unprotected")
async def unprotected_endpoint():
    """
    An unprotected endpoint that anyone can access.
    """
    return {"message": "This is an unprotected endpoint."}

if __name__ == "__main__":
    import uvicorn
    # This is for development only. In production, use a proper ASGI server.
uvicorn.run("main:app", host="0.0.0.0", port=8000, reload=True)An Important Note on Session Cookies and SSO
We use Starlette’s SessionMiddleware for session management. When a user logs in, their identity information will be stored in a secure, signed cookie.
During the SSO process, the user is redirected from your application to Microsoft’s login page and then back. From the browser’s perspective, this is a cross-site request. For the session cookie to be correctly handled after this redirect, it must be configured with SameSite=None and https_only=True. This tells the browser that the cookie can be sent in cross-origin contexts, but only over HTTPS.
Tip 1 : When SameSite=None is used, browsers will silently refuse to set the cookie if the connection is not secure (i.e., not HTTPS). This can be a huge pain to debug because your authentication flow will simply fail without an obvious error. When deploying to Azure or any other production environment, ensure you are using HTTPS.
Tip 2 : This can make it difficult to work locally; you will need to use an HTTPS URL for local development as well. In some cases, some browsers will allow you to disable this security for development purposes.
Tip 3: Be careful when constructing your response objects in FastAPI. If you create a new Response object instead of letting FastAPI manage it, you might accidentally wipe out the Set-Cookie header that the SessionMiddleware adds, effectively logging the user out. It’s best to modify request.session and let the middleware handle the cookie management.
Step 4: Testing Your Implementation
Now that everything is set up, let’s test the authentication flow. Start your FastAPI application:
python main.py
Or using uvicorn directly:
uvicorn main:app --reload
Your application should now be running. You can test the authentication flow:
- Navigate to the address in your browser
- You’ll be redirected to Microsoft’s login page
- Sign in with your Microsoft Entra ID credentials
- After successful authentication, you’ll be redirected back to your callback endpoint
- The callback will return your user information and tokens
- You should now have access to your application
Step 5: Security Disclaimer
While the implementation above covers the full SSO flow and includes signature verification, this guide is intentionally simplified for learning purposes. Before moving to production, consider the following security best practices:
- Use HTTPS Everywhere: Always use HTTPS in production. The
SessionMiddlewaredepends on secure cookies which will be rejected over plain HTTP when doing cross-site redirects. - Secret Rotation: Store your
SECRET_KEYandAZURE_CLIENT_SECRETsecurely (e.g., using Azure Key Vault or AWS Secrets Manager) and rotate them regularly. Do not hardcode them. - Server-Side Sessions: For high-security applications or applications with a large amount of user data, consider using server-side sessions (e.g., storing session data in Redis) instead of client-side cookies.
- Token Validation: While we added basic signature validation, ensure you validate the issuer, audience, and expiration claims as shown. In a multi-tenant application, you must also carefully validate the tenant ID.
Complete FastAPI Azure SSO Example
Here is the complete main.py file :
import os
import secrets
from typing import Any, Dict, List

import httpx
import msal
from dotenv import load_dotenv
from fastapi import Depends, FastAPI, HTTPException, Request, status
from fastapi.responses import RedirectResponse
from jose import jwt, JWTError
from starlette.middleware.session import SessionMiddleware


load_dotenv()

# -------------------------------------------------------------------
# Configuration
# -------------------------------------------------------------------

AZURE_CLIENT_ID = os.getenv("AZURE_CLIENT_ID")
AZURE_CLIENT_SECRET = os.getenv("AZURE_CLIENT_SECRET")
AZURE_TENANT_ID = os.getenv("AZURE_TENANT_ID")
AZURE_REDIRECT_URI = os.getenv("AZURE_REDIRECT_URI")
SECRET_KEY = os.getenv("SECRET_KEY")

if not all(
    [
        AZURE_CLIENT_ID,
        AZURE_CLIENT_SECRET,
        AZURE_TENANT_ID,
        AZURE_REDIRECT_URI,
        SECRET_KEY,
    ]
):
    raise RuntimeError(
        "Missing environment variables. Please define "
        "AZURE_CLIENT_ID, AZURE_CLIENT_SECRET, AZURE_TENANT_ID, "
        "AZURE_REDIRECT_URI, and SECRET_KEY."
    )

AUTHORITY = f"https://login.microsoftonline.com/{AZURE_TENANT_ID}"

# User.Read lets the app request basic Microsoft Graph user information.
SCOPE = ["User.Read"]

# -------------------------------------------------------------------
# FastAPI app
# -------------------------------------------------------------------

app = FastAPI(title="FastAPI Microsoft Entra ID SSO Example")

# -------------------------------------------------------------------
# Session middleware
# -------------------------------------------------------------------
#
# In production:
# - https_only=True
# - same_site="none"
#
# For local HTTP development, you may temporarily use:
# - https_only=False
# - same_site="lax"
#
# Be careful: SameSite=None requires HTTPS in modern browsers.

app.add_middleware(
    SessionMiddleware,
    secret_key=SECRET_KEY,
    https_only=True,
    same_site="none",
)

# -------------------------------------------------------------------
# MSAL client
# -------------------------------------------------------------------

msal_client = msal.ConfidentialClientApplication(
    client_id=AZURE_CLIENT_ID,
    authority=AUTHORITY,
    client_credential=AZURE_CLIENT_SECRET,
)

# -------------------------------------------------------------------
# Authentication routes
# -------------------------------------------------------------------

async def get_microsoft_jwks():
    """Fetch the public keys used to sign the tokens."""
    async with httpx.AsyncClient() as client:
        response = await client.get(
            f"https://login.microsoftonline.com/{AZURE_TENANT_ID}/discovery/v2.0/keys"
        )
        return response.json()


@app.get("/login")
async def login(request: Request):
    """
    Start the Microsoft Entra ID login flow.

    The user is redirected to Microsoft.
    A random state is stored in the session to protect against CSRF.
    """

    state = secrets.token_urlsafe(32)
    request.session["state"] = state

    authorization_url = msal_client.get_authorization_request_url(
        scopes=SCOPE,
        state=state,
        redirect_uri=AZURE_REDIRECT_URI,
    )

    return RedirectResponse(url=authorization_url)


@app.get("/login/callback")
async def login_callback(code: str, state: str, request: Request):
    """
    Handle the OAuth callback from Microsoft Entra ID.

    Microsoft redirects the user here with an authorization code.
    The app exchanges that code for tokens, then stores the user identity
    in the session.
    """

    expected_state = request.session.get("state")

    if not expected_state or state != expected_state:
        raise HTTPException(
            status_code=status.HTTP_400_BAD_REQUEST,
            detail="Invalid state parameter",
        )

    request.session.pop("state", None)

    token_response = msal_client.acquire_token_by_authorization_code(
        code=code,
        scopes=SCOPE,
        redirect_uri=AZURE_REDIRECT_URI,
    )

    if "error" in token_response:
        raise HTTPException(
            status_code=status.HTTP_401_UNAUTHORIZED,
            detail=token_response.get(
                "error_description",
                "Failed to acquire token",
            ),
        )

    id_token = token_response.get("id_token")

    if not id_token:
        raise HTTPException(
            status_code=status.HTTP_401_UNAUTHORIZED,
            detail="No ID token returned by Microsoft Entra ID",
        )

    # Fetch public keys from Microsoft to verify the token
    jwks = await get_microsoft_jwks()

    # Get the unverified header to find the correct key
    unverified_header = jwt.get_unverified_header(id_token)
    rsa_key = {}
    for key in jwks["keys"]:
        if key["kid"] == unverified_header["kid"]:
            rsa_key = {
                "kty": key["kty"],
                "kid": key["kid"],
                "use": key["use"],
                "n": key["n"],
                "e": key["e"]
            }
            break

    if not rsa_key:
        raise HTTPException(status_code=401, detail="Invalid token: Public key not found")

    try:
        # We validate issuer, audience, expiration, and signature using Microsoft's JWKS endpoint.
        id_token_claims = jwt.decode(
            id_token,
            rsa_key,
            algorithms=["RS256"],
            audience=AZURE_CLIENT_ID,
            issuer=f"https://login.microsoftonline.com/{AZURE_TENANT_ID}/v2.0"
        )
    except JWTError as e:
        raise HTTPException(status_code=401, detail=f"Token validation failed: {str(e)}")

    request.session["user"] = {
        "id": id_token_claims.get("oid"),
        "name": id_token_claims.get("name"),
        "email": id_token_claims.get("preferred_username"),
        "roles": id_token_claims.get("roles", []),
    }

    return RedirectResponse(url="/protected")


@app.get("/logout")
async def logout(request: Request):
    """
    Clear the local session.

    This logs the user out of the FastAPI app, but not necessarily
    out of their Microsoft account.
    """

    request.session.clear()
    return RedirectResponse(url="/unprotected")


# -------------------------------------------------------------------
# Dependencies
# -------------------------------------------------------------------


def require_auth(request: Request) -> Dict[str, Any]:
    """
    Require the user to be authenticated.

    If no user is found in the session, redirect to /login.
    """

    user = request.session.get("user")

    if not user:
        raise HTTPException(
            status_code=status.HTTP_302_FOUND,
            headers={"Location": "/login"},
        )

    return user


def require_roles(required_roles: List[str]):
    """
    Require the user to have at least one of the given roles.

    Example:
        Depends(require_roles(["Admin"]))
    """

    def role_checker(user: Dict[str, Any] = Depends(require_auth)):
        user_roles = user.get("roles", [])

        if not any(role in user_roles for role in required_roles):
            raise HTTPException(
                status_code=status.HTTP_403_FORBIDDEN,
                detail="You do not have permission to access this resource.",
            )

        return user

    return role_checker


# -------------------------------------------------------------------
# Application routes
# -------------------------------------------------------------------


@app.get("/")
async def root():
    return {
        "message": "FastAPI Microsoft Entra ID SSO example",
        "routes": {
            "login": "/login",
            "logout": "/logout",
            "unprotected": "/unprotected",
            "protected": "/protected",
            "role_protected": "/roleProtected",
        },
    }


@app.get("/unprotected")
async def unprotected_endpoint():
    """
    Public route.
    Anyone can access this endpoint.
    """

    return {
        "message": "This is an unprotected endpoint.",
    }


@app.get("/protected")
async def protected_endpoint(user: Dict[str, Any] = Depends(require_auth)):
    """
    Protected route.
    The user must be logged in.
    """

    return {
        "message": f"Hello, {user.get('name')}! This is protected data.",
        "user_details": user,
    }


@app.get("/roleProtected")
async def role_protected_endpoint(
    user: Dict[str, Any] = Depends(require_roles(["Admin"])),
):
    """
    Role-protected route.
    The user must be logged in and have the Admin role.
    """

    return {
        "message": f"Welcome, Admin {user.get('name')}!",
        "detail": "You have access to this role-protected data.",
    }


# -------------------------------------------------------------------
# Development entrypoint
# -------------------------------------------------------------------

if __name__ == "__main__":
    import uvicorn

    uvicorn.run(
        "main:app",
        host="0.0.0.0",
        port=8000,
        reload=True,
)And the matching .env file:
AZURE_CLIENT_ID=your-client-id
AZURE_CLIENT_SECRET=your-client-secret
AZURE_TENANT_ID=your-tenant-id
AZURE_REDIRECT_URI=https://your-domain.com/login/callback
SECRET_KEY=replace-this-with-a-long-random-secret
You can find the complete source code here: GitHub link
If you want to deploy this FastAPI application later, you can also read my guide on deploying applications to Kubernetes.
Common Errors
- Cookies reset: Be careful that your browser doesn’t reset your cookies. Make sure you use the right parameters when creating cookies as discussed above.
- Cookies not saved: This usually happens when
SameSite=Noneis used without HTTPS. Modern browsers reject this cookie silently. - Redirect URI mismatch: Make sure the redirect URI in Azure exactly matches your
AZURE_REDIRECT_URI. - Testing in http, not https: If you test on a local http://localhost url. Your cookies won’t be saved. This is because this isn’t an HTTPS URL.
- Token Expiry: Tokens have an expiration date. Don’t use the same token for too long when testing.
- Infinite redirect loop after login: This often means the session cookie is not being stored or the user data is not saved in
request.session. - Invalid state parameter: This usually means the
statestored before login does not match thestatereturned by Microsoft. - Missing roles in the token: If
rolesis empty, check that app roles are configured in Microsoft Entra ID and assigned to the user or group.
Conclusion
In this guide, we successfully integrated Microsoft Entra ID (Azure AD) SSO into a FastAPI application. We started by setting up the necessary infrastructure in the Azure Portal, including app registration and redirect URIs. We then built the application logic: configuring MSAL, managing the OAuth redirect/callback flow, validating the JWT signature using Microsoft's public keys, and storing user identity inside a signed cookie session. Finally, we learned how to protect our endpoints and implement role-based access control (RBAC).
By following these steps, you now have a solid foundation for adding enterprise-grade authentication to your FastAPI applications. For production deployments, remember to apply the security best practices discussed above, such as enforcing HTTPS, rotating secrets, and considering server-side sessions.
Read More
If you are new to web authentication, you may also enjoy my article on how the internet works. For deployment, you can follow my guide on deploying applications to Kubernetes. For a self-hosted setup, see my guide on exposing a Kubernetes app to the internet with HTTPS.